
Removing a background from an image is a common task that every designer needs to do on an almost regular basis. There are so many ways that you can extract a subject from its background to end up with a transparent background. With all the different ways, there is really is no exact method that you should take every time. Depending on the background or complexity is how you should determine which method you should take.
If you have the luxury of being the designer as well as the photographer, then you have complete control of the contrast between the subject and the background. Try to make the background as plain as possible with highly defined edges. This will make any of the methods below an easy process in removing the background.
Most of the time you will be supplied an image or have to find one on a stock site. Unfortunately, if the background is pretty intricate, you will have more of a time consuming road ahead of you. You should assess your image and try to figure out which method will be the easiest and cleanest way possible for your design.
Becoming a master at extraction is very useful in all design jobs. Go through the different options below and find the method that you like the best. More than likely you will find yourself using a mixture of multiple techniques to achieve a perfect extraction.
Extract Filter
The Extract filter is an oldie but goodie extraction filter that originally came pre-installed with Photoshop. The filter is now available as an add-on that you can get from the Adobe website for free. Adobe removed the Extract filter so they could create new tools built directly into Photoshop. Some of these new tools like Refine Edge are already built into newer versions of Photoshop, while others are still in development. Until all the new tools completely replace Extract, it will remain available as an optional download. The extract filter is mainly used when you’re in a rush and want to get fast results.
- Easy to use and learn
- Great for hair
- Great results when the background is not to complex. Try to use it on a solid background
- You have to manually install it into Photoshop
- Not the best results when compared to other techniques
- If the background is complex, the filter sometimes leaves unwanted pixels
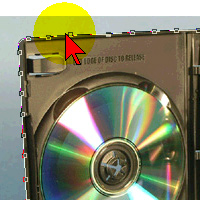
Fine Selections Using Photoshop’s Extract Filter
The Extract filter dialog box provides an elegant way to isolate a foreground object or objects and remove the background on a layer. Even objects with wispy, intricate, or undefinable edges may be clipped from their backgrounds with a minimum of effort. When you extract the object, Photoshop erases its background to transparency. Pixels on the edge of the object lose their colour components derived from the background, so they can blend with a new background without producing a halo effect.

The Extract Tool
One of the most common things beginners to Photoshop wants to be able todo is seperate one object or so from it’s background. There are as many ways to extract an object from it’s background as there are languages on our earth and every one is different from eachother. One way is using the filter in Photoshop called Extract.
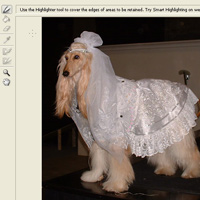
Learn how to use the Extract Filter
Before we start working with the tools in the Extract dialog box, let me give you an overview of what’s needed to successfully extract an image from its background. Extract needs three pieces of information: which areas should be thrown away, which areas should be kept, and which areas contain the transition between the first two areas (including semi-transparent areas).
Magic Wand
The Magic Wand tool is a selection tool that allows you to select similar colored area without having to trace around the outline of the object. You have some available options to help get the perfect extraction, like specifying the color range and tolerance for the selection.
- Arguably the fastest way to remove a background
- Great for simple objects and plain backgrounds
- Edges are not as clean as other methods
- Does not work in Bitmap mode or on 32 bits-per-channel images
- New tools, like Quick Selection, have pretty much replaced the Magic Wand
Photoshop 101 – The Magic Wand Tool
Especially for high contrast images the Magic Wand tool makes selection simple. A tool for daily use this example shows how to remove a background quickly and easily. A little like the Magnetic Lasso tool the Magic Wand does much of the hard work for you. It works by selecting pixels based on settings defined by you. Select the Magic Wand tool by pressing W.
Photoshop CS4 Magic Wand tool tutorial
A quick video tutorial on how to use the magic wand tool in Photoshop (works for many versions before CS4 as well)
Quick Selection & Refine Edge
Introduced in Photoshop CS3, the new Quick Selection Tool is a great way to quickly paint a selection around an object. As you create the selection it will automatically find and follow defined edges of you object you are trying to extract. The new Quick Selection tool is far superior to the Magic Wand. Refine edge is a time saver that will help you create the perfect selection.
- Great if the object you are trying to extract has defined edges
- Simple and Intuitive
- Plain Backgrounds work best with the Quick Selection Tool
- Can be difficult if your the object and the background colors blend
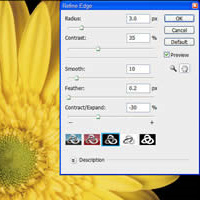
Quality Selections Made Easy: The Quick Selection Tool
The ability to select an object in an image to either remove it from its background or isolate the object for specific correction/manipulation has certainly been available in earlier versions of Photoshop forever. The problem people seem to have has always been the quality of the selections.

Russell Brown Show – Quick Select
Start by using the Quick Select Tool and Marquee Tool for making a selection in Photoshop CS3. Then, easily modify the selection with the new Refine Edge feature.
Background Eraser Tool
The Background Eraser tool is another tool that is great if you want to quickly remove a background from your object. The background eraser simply erases background pixels from background with the same color while softening the edges of your object.
- Easily removes a background if the color of the background is plain
- Fast and instant results
- Great with simple objects
- Can create too soft of edges
- Does not work well with multi-colored or complicated backgrounds
- Terrible results with intricate of wispy hair or edges
- Occasionally leaves stray pixels

Photo Retouching: Background Extraction and Color Manipulation
One of the most common uses of Photoshop is to extract images from their backgrounds, so that they can be introduced into various other projects. There are many ways to accomplish this task, whether through use of the pen tool, magic wand or magic lasso, however there is a tool that is both effective and easy to use which will erase This tutorial aims to educate the reader about the Background Eraser Tool, as well as how to manipulate colors and lighting in Photoshop.
The Erase Background Tool
The erase background tool is powerful, but good results are only possible if you understand how it works. In this tute, we will look at all the options in the tool and use them to extract backgrounds from our images.
The tool works best if the background is all a similar colour, for example, someone against a solid colour or a bright sky.
Magnetic Lasso Tool
The Magnetic Lasso Tool is another selection tool that is used primarily on simple background removals. When you use the tool, it will snap to defined edges of your object you are trying to extract. You have the ability to set feathering and anti-aliasing in the options bar which will make the extraction look a whole lot better.
- Easily remove a plain one color background
- Simple and easy
- Can be tricky if you don’t know shortcut keys to step backwards
- If the background and the subject have blending colors this is not the tool for you
- If the background is complex, the filter sometimes grabs areas of the background

Select with the Magnetic Lasso Tool
The Magnetic Lasso tool is especially useful for quickly selecting objects with complex edges set against high-contrast backgrounds. When you use the Magnetic Lasso tool , the border snaps to the edges of defined areas in the image.
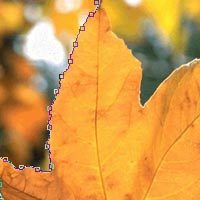
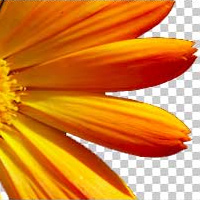
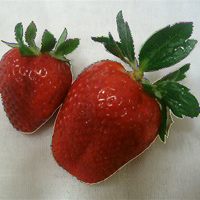
Removing the Background With the Magnetic Background
What this image has going for it is a very distinct edge, which makes it a perfect candidate for the magnetic lasso tool. I ruled out the background eraser because there were color variations in the background that were very similar in color to the leaf color.
Using the Magnetic Lasso Tool to Delete the Backgrounds of Your Images – Video Tutorial
Using the Magnetic Lasso Tool in Adobe Photoshop, you can quickly and easily delete the background from your images. In this screencast tutorial, we show you how by selecting the region of the image that you want to keep, and then deleting the inverse of your selection, you can delete the background from any image.
Extraction using Channels
Extracting using channels is by far the best way to extract an subject from the background. This technique however, does require a few more advanced steps and an eye for perfection.
- Easily removes simple one color backgrounds
- Great for hair and other wispy subjects
- Difficult to understand for beginners
- Requires knowledge of other tools
- Usually requires additional methods
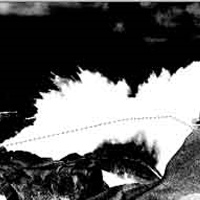
Difficult Background Removal
In this lesson we are going to explain all the required passages to isolate the main subject of a picture and isolate it from the rest. The goal is to remove the sky and the sea and leave the wave and the rocks. We are dealing with a pretty difficult main subject to cut away. The wave has a very irregular and not so sharp border in most of its length.

Removing the Background – Photoshop Channel Mask
It may seem like a real challenge to pull the fireworks out of this image. The selection tools won’t work, and the background eraser didn’t produce very good results either. I’m going to show you an amazingly simple technique for masking the fireworks in this image using the channels palette.
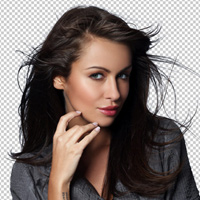
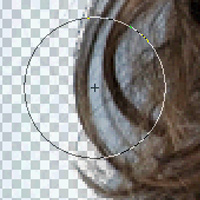
Handy Techniques for Cutting Out Hair in Photoshop
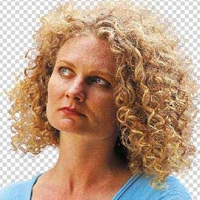
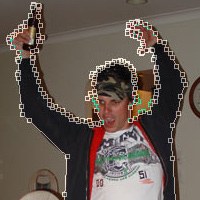
The best photos are those professional studio type shots that are taken against a plain white background. These shots make it much easier to find the edges of the subject, but trimming out fine hairs can still be a little tricky. In this example we’ll be using the common Channel technique to trim out this lovely lady.

Handy Techniques for Cutting Out Hair in Photoshop
Selecting fine strands of hair is one of the trickiest jobs in Photoshop, and it’s so hard to find bald models. Here Justin Maller shows you some clever techniques for making accurate selections of complex subjects. The crux of this process lies in using channels to make a detailed alpha mask for your image
Pen Tool Extraction
The Pen tool is a favorite method by most experienced designers. The reason it is a favorite is because you create the selection by hand! There is no magic to it, you judge where you want the selection. You create a path around the object you wish to extract and create a selection from it to remove the background. Although it does take some time to create the selection, it creates a crisp and clean outline. The more you use the Pen tool the better you will be at it.
- Creates very clean selections
- Great for backgrounds that blend in with the subject
- Precise lines, and is easily editable
- Works fantastic when used in conjunction with Refine Edge
- The Pen tool has a steep learning curve
- Bad for Hair or transparent objects
- Time consuming
How to Use the Pen Tool in Photoshop: A Tutorial on Outlining Objects
The pen tool in Photoshop—ever use it? Using the pen tool can be kind of weird the first time (even downright confusing) but it’s a great tool for artists to know how to use. Using the pen tool, you can perfectly outline your artwork, and then delete everything else around it so that nothing detracts from your art.
Cutting Out An Image With the Pen Tool
In this Photoshop tutorial we will explore how to use the pen tool. First, we will look at the pen tool’s basic controls. We will examine creating paths, curvature modification and anchor point adjustments. Next, we will use our new pen tool skills to cut out an image. This skill is so essential to know when using Adobe Photoshop, and it really illustrates the power behind the pen tool.
3rd Party Filters & Programs
Not too happy with the results your getting from using the techniques above? Well, you’re in luck, there are some really innovative programs that are available to purchase. They aim at making extracting subjects from the background a lot easier than the built in tools in Photoshop. Here are the most popular filters out right now.

Mask Pro
Cost: $159.95
For removing unwanted backgrounds, Mask Pro 4.1 is the Photoshop plugin recommended by Advanced Photoshop magazine. Mask Pro 4.1 allows you to cut out a subject from the background by assigning keep and drop colors and simply painting away the background. Mask Pro 4.1 makes it easy to create masks, selections and clipping paths on difficult subjects like hair, glass and fog all in real-time.

Topaz ReMask
Cost: $69.99
Topaz ReMask is simply the fastest, easiest, and most effective way to create detailed masks and extractions. It is is specifically engineered to supercharge the masking and extraction workflow for photographers and designers within Photoshop. Other masking tools – both within Photoshop and other third party filters – require intricate brushing, sampling, and refining for a detailed mask. Topaz ReMask, on the other hand, does all the heavy lifting while requiring a minimum of user input.
Fluid Mask
Cost: $149
Fluid Mask 3 is the professionals choice. Fluid Mask 2 established itself as the market leader in still image cutting out – Fluid Mask 3 takes masking to the next level. Quick to pick up and intuitive to use, Fluid Mask 3 gets professional results fast. Now Professional results are more possible than ever before. Make super fine mask selections using new sampling and selecting tools. Check out the new edge blending algorithms. And the new complex hair blending that automatically gets great results from multi-colored wispy hair. No longer should hair be the cutting-out nightmare it is today.
Conclusion
Whether you use a 3rd party filter or the tools built within Photoshop, go with what looks best in your final design. Learn to use all the different methods – it will really pay off. I personally use a combination of the Pen tool and channels extraction methods almost all the time.
Let me know in the comments what methods or filters you use! I would love to know.
If you enjoyed this article, please help us out by retweeting or stumbling it.


Jeya, this is a GREAT resource! Thanks for putting so many different tutorials together in one post so they are easy to access and peruse.
My weapon of choice is the pen tool, but if I am in the hurry and the background & foreground are not complex, I will use a combination of the magic wand tool and magnetic lasso too.
Great article!
Nice, lots of content here to try out! LOL Using PS for 11 years and still finding stuff…did not even pick up on the Quick selection/refine edge in CS3, I seen the refine edge button in CS4 but never messed with it. Always something to learn, Thanks!
Good collection of resources! 🙂
You may also check/add “Working with masks in Adobe Fireworks CS4”:
http://www.adobe.com/devnet/fireworks/articles/masking_preso.html
And “Removing image backgrounds with Adobe Fireworks”:
http://www.adobe.com/devnet/fireworks/articles/removing_backgrounds.html
Both are extremely useful and can better help not only Photoshop users, but also those working with Fireworks! 😉
I have read/seen both resources (links to which I just posted) and have found them very good and helpful in my daily design work.
Great round up of great resources thnx for sharing Jeya.
what is with the “Mask Mode” (dunno what it’s in english “Q”key) It’s definatly not the best way but it is a way…
I was thinking the same Rawsta.
The Quickmask method is great to use with anything organic.
onre of the mosst complete and well commented compilation post about eliminate backgrounds tools and methods
Where are Masks? I use Masks to remove backgrounds, not quick masks though, i manually brush the entire background and i get 100% perfect removals even with hair, time consuming though… but my standards are high. When the background seems easy i use the Magic Wand and some blur.
the pen tool is not very time consuming, its just really hard to learn. but once u learn it and u can use it well, its very fast. and was the question about masks answered?
Thanks everyone for you very kind comments.
Masks are great addition to all of the selection based extraction methods above. You first make a selection and then create a layer mask from that selection. The great thing about masks is that instead of erasing data from your image, you can use a mask that can be easily edited to fix any areas that don’t look perfect. You can also use masks with the brush tool. I highly recommend using a mask instead of deleting or erasing parts of your images.
@Pedro Hazza: I agree that if you are good at the Pen Tool, you can create paths extremely fast. Most people that I have seen however, fumble through creating the paths and it becomes a time consuming engagement.
@Michel: I love hearing your knowledge and expertise on Fireworks. Thank you so much for providing those links. They will surely help people out.
The URL for the fireworks masking technique is:
http://graphicssoft.about.com/od/photoshop/l/blrbps_2fwks.htm
Lots of great content here. Thank you for all the information.
What a great post! I have tried most of your methods, but never really understood the pros and cons of each. Thanks for sharing it with us!
I also use the Quickmask method. I feel it is more precise than the pen tool. If there is a solid background I will use the wand, convert to (Q) Quickmask and use the eraser brush to fine tune and finally I will use refine edges to complete the selection.
this post is wonderful… I’ve learned alot already.
Are the techniques similar for other programs such as gimp, inkscape and/or paint.net?
Excellent list, will definitely bookmark for quick reference.
amazing techniques……a grand applause….many thanks
what about bringing the image into illustrator or indesign, then you can automatically filter out the background using multiply, then you dont have to do anything and maybe you could then open the image up in photoshop?
Very Comprehensive – very well done
I’ve tried them all over the years and still favout the pen for clean images or channel masks for complicated ones. Of the plugins Mask Pro is about the best of them imo
Very nice to see this tutorial. I’ve look for a long time. Now I found you. Thank you very much for sharing
very good post thanks
Very nice to see this tutorial. I’ve look for a long time.
thank you! always have had a problem with that! very helpful info!
Freelance Translation Studio
Translation and Localization into CIS languages
http://www.ft-studio.com
http://twitter.com/ft_studio
There are many strategies for removing backgrounds (foreground extraction) in Photoshop depending on the particular situation. If you have an image that has both fuzzy outlines (frizzy hair) and sharp outlines (arms & shoulders), a combination of these techniques maybe required. Employing channel masks maybe the best way to combine several techniques.
Your honesty in detailing all pitfalls involved presents a refreshing relief that background extraction is so simple that software alone (unaided by the human eye) can do the job. Please wake me up developers when color discrimination can takeover — you can do it.
the anti_supernaturalist
very good post thanks so much.
thank you! always have had a problem with that! very helpful info!
koh samui
very nice photoshop techniques, tutorials
Great!!!! Thanks
This is a helpful resource for me and an overview of some of photoshops tools. Thanks for sharing.
Suberb topic, thanks.
Photoshop does many wonders to dull and unwanted photos. A big thumbs up to the creator of photoshop.
Another awesome Photoshop tutorial! thanks for sharing!
Thank You So Much .. ^_^
Thank you!
it’s pretty cool while you can do anything with ps. adobe creates great product.
thank alot for technique, Adobe photoshop?
The first thing you want to do to edit pictures. Now has become a nightmare of ways to do it. It’s like beating a dead horse with a stick. “wait! There are 100 more sticks to try!” Someone needs to put together a DICTIONARY of Photoshop tools with a detailed explanation of what each tool does. How about this tool, it’s called “Background Delete”.
I agree. The best thing you can get is the Adobe Reference: http://help.adobe.com/en_US/photoshop/cs/using/index.html
Very nice to see this tutorial. THANK for sharing…
Am I the only one that uses a combo of the magic wand and polygonal lasso (+ feather selection or refine edge)? I get perfect masks everytime, and seems slightly quicker and more accurate than the pen tool method. Although it was quite slow in the beginning, it seems pretty quick now.
great technique, thanks for sharing this tutorial.
Very nice to see this tutorial. I’ve look for a long time.
Cool i love it
Thanks You
What fabulous information! I do digital scrapbooking and teach classes in it. Doing precise selections is a huge part of the work. These articles/tutorials have really helped. I’ll be passing them on to my students. Thank you so much!
It is pretty awesome and I really like it. Such a simple info but very attractive. The author and look refreshing. The blog design was emphasize better because of the huge graphics work. Thank you
Remove Background
thanks very much,this article is very useful.
Thanks for the gret tutorial. Ive been looking for something like this for a while, so its nice to find someone that has put in the work and time to do a step-by-step on how to remove backgrounds. Great work, thanks again.
Nice. thanks very much, 🙂
THANK for sharing…
great technique, thanks for sharing this tutorial.
Thanks for sharing! I’ve been wondering best practices for the magic wand tool for a while, now.
Actually very easiest process. Hope you will be submit more tutorials. Thanks.
a standout among st the most total and all around remarked assemblage post about dispense with foundations apparatuses and strategies