
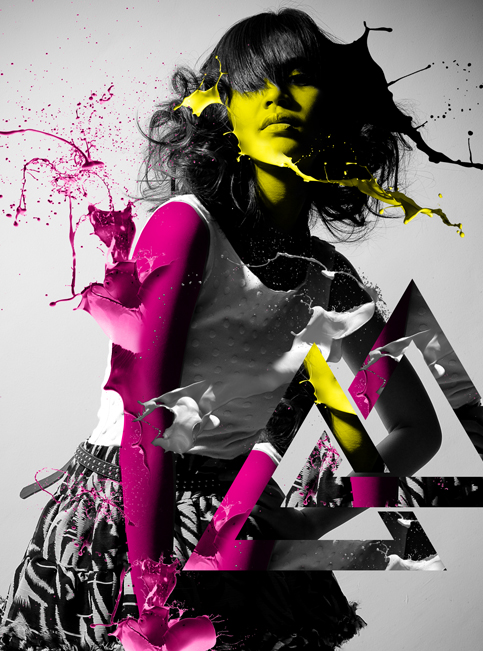
Create this sophisticated looking design with this step by step tutorial with the help of Media Militia’s awesome paint tossing pack. Yes, its easier than you think!
This particular design was featured and printed in the recently held Graphika Manila 2010 as one of the design contribution of Team Manila.
About
Artist: Heinritzh Sales
Time: 1-2 Hours
Software Required: Photoshop
Resources Used
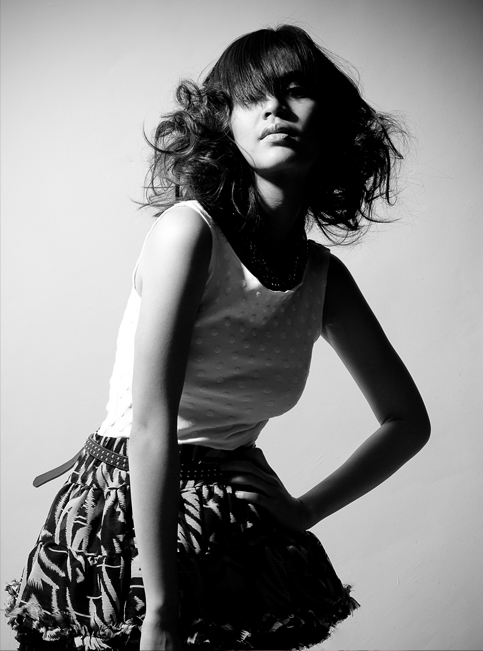
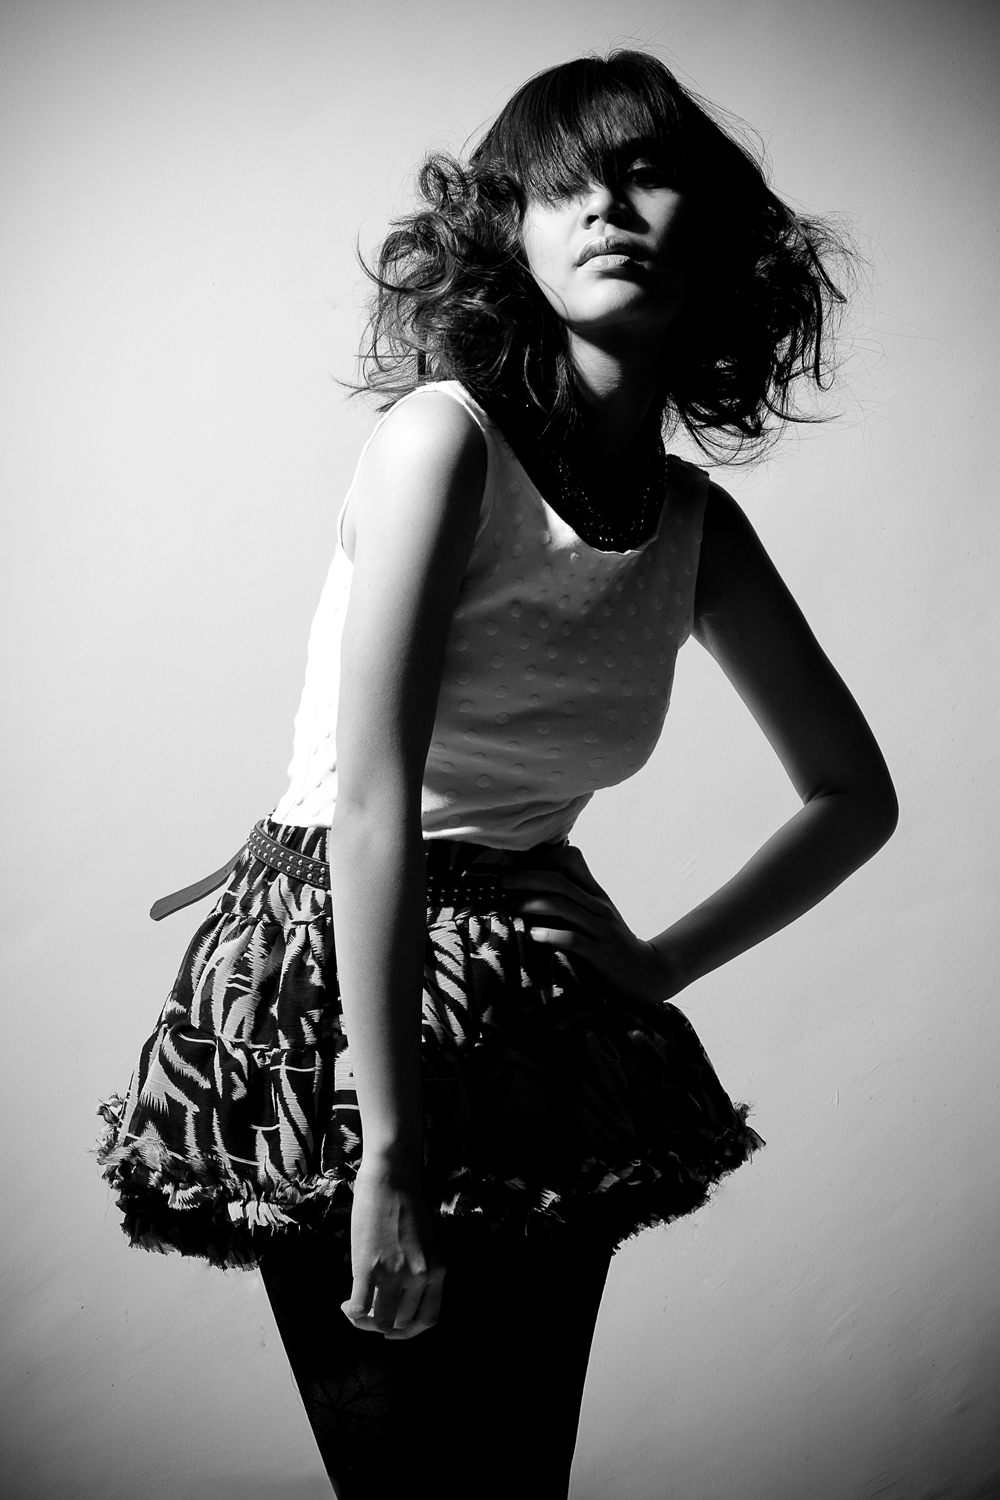
Base Photo
Courtesy of Ms.Camille Cordero
(Must be used for non-commercial purposes only)
Additional Credits:
Model: Yas Neri
Make-up and Styling: Jaime Bautista-Garcia, Pearl Romano, Rem Lucio
Hair: Jay Wee
Paint Tossing Pack by Media Militia
*I will be using PC here, so just change all Ctrl to Command and Alt to Option if your using a mac.
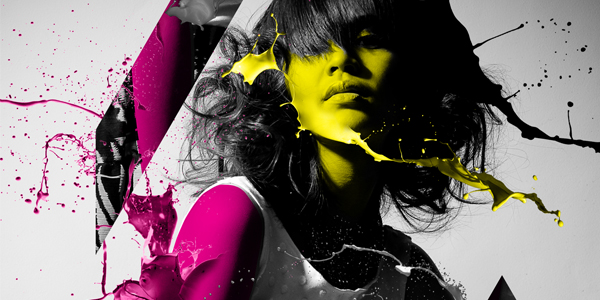
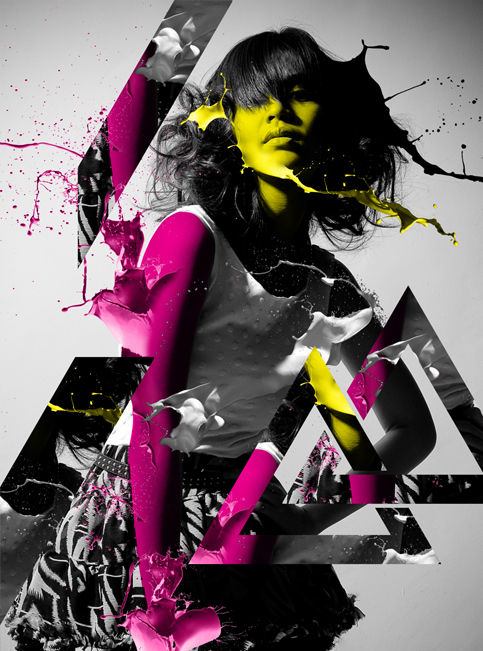
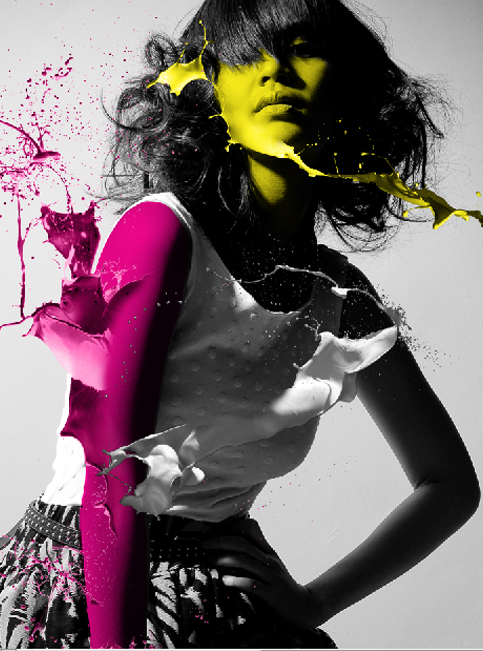
Final Preview
Part 1
Open the “base-image_by-camille-cordero.jpg” image and name this layer “Base Image”.
Part 2: Body Painting
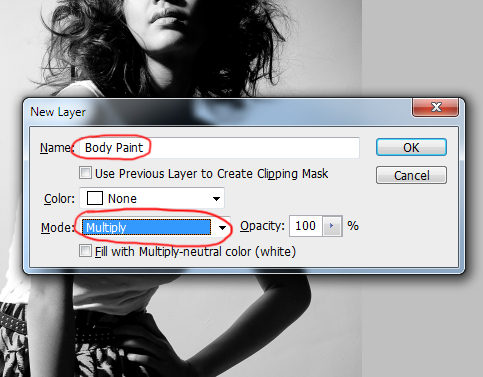
Create a new layer (Shift Ctrl+N) and name it “Body Paint”. Set the Layer Blend Mode to “Multiply”
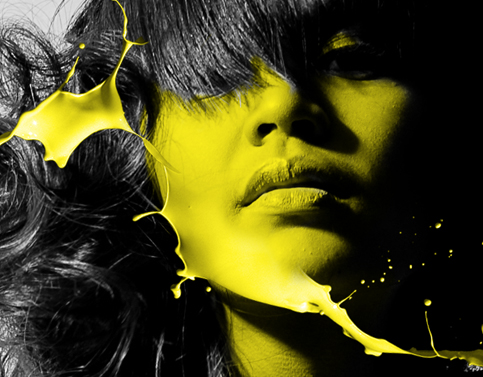
We are going to start off by using a brush to paint the face and the left arm of the base image.
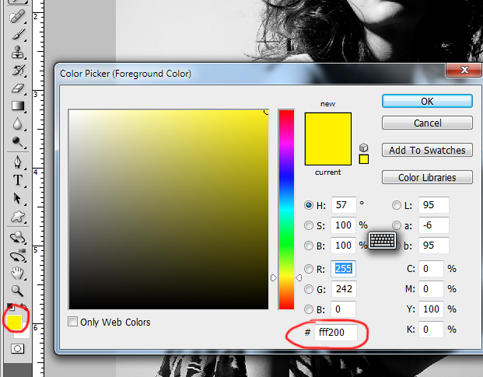
First select the brush tool and choose a soft rounded brush. Make the size according to your preference.
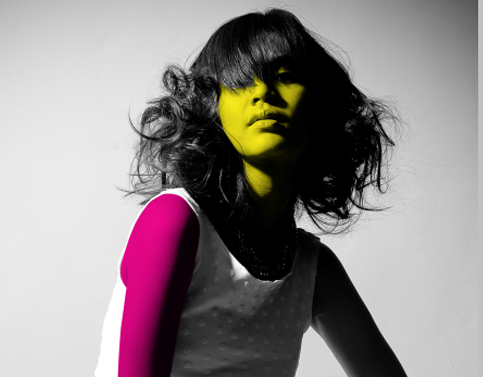
After that change the foreground color to #fff200.
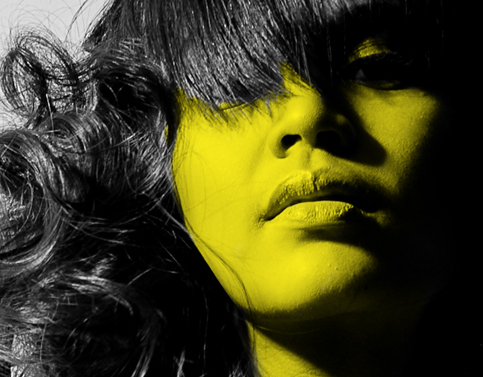
Now we are ready to paint. Start off with the face and the neck first. In this step feel free to zoom in and zoom out and change the brush size according to your needs.
Note: Keyboard shortcuts are very handy in this step. The keyboard shortcut for zooming in is Ctrl+ and zooming out is Ctrl -. To change the brush size, you can use right bracket sign “]” to increase your brush size and left bracket sign “[“ to make it smaller.
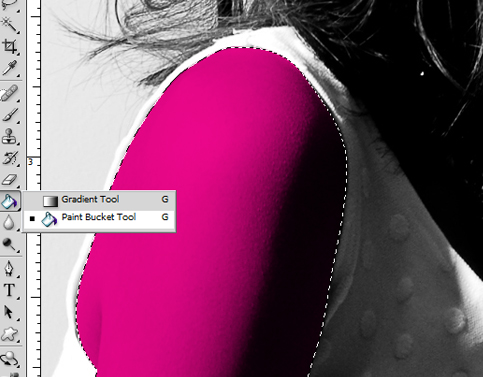
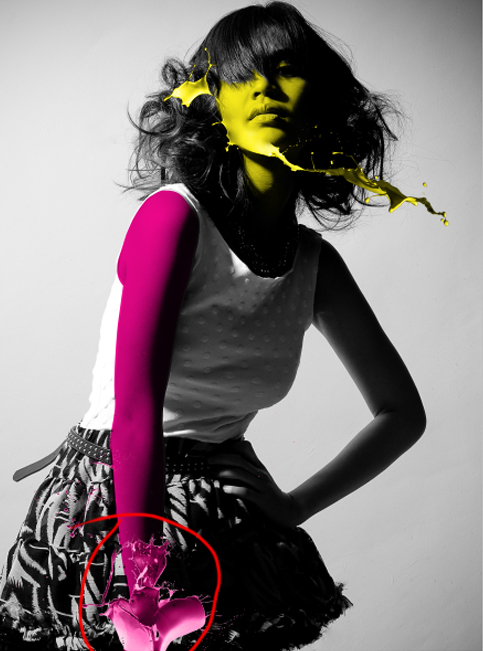
Now we are going to do the left arm but first change the foreground color to “#ec008c”
Choose the Pen tool and trace around her arm.
After you are done tracing, press Ctrl+Enter, this will make a selection. The blinking dashed-lines (marching ants)
will appear.
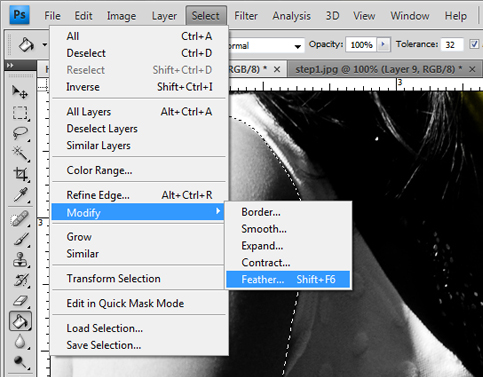
From the menu bar, choose Select>Modify>Feather and choose 0.5, then click OK. (if your using CS3 click Ctrl+Alt+D to show feather option.)
Now choose the paint bucket tool (G) and click on the selected area then press Ctrl+D to deselect.
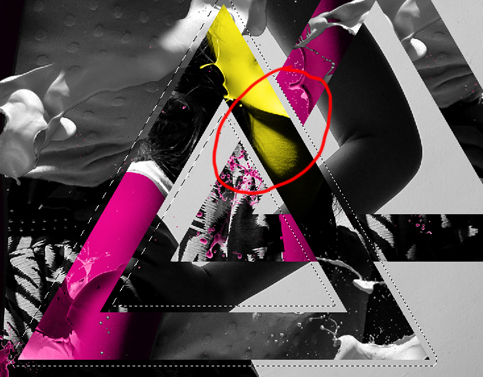
Part 3: Adding the Paint Toss
Now lets get wet and toss her the paints! (Please remember this part since we will use this technique in the succeeding part).
Open number nine paint toss from the media militia paint tossing pack. Drag this to you working document. Use the magic wand to select the black in this image. Press delete to remove the background.

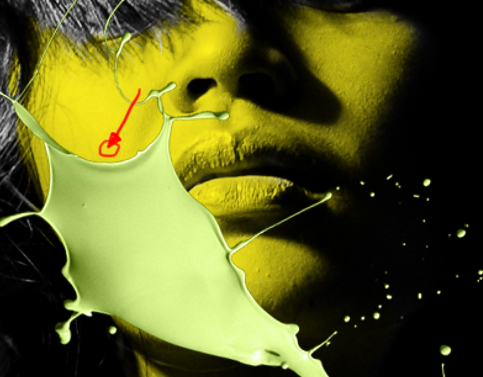
Press CTRL+D to deselect the selection. Name this layer “face toss” and position the orientation of the paint (ctrl+T) like shown below:
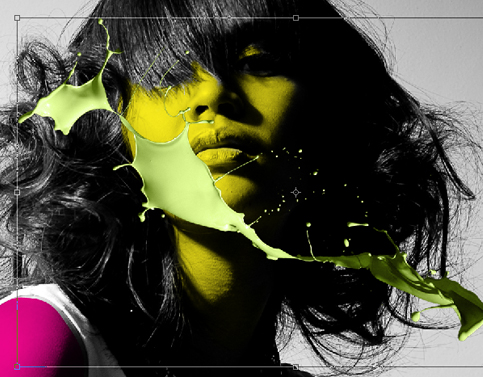
Now we will blend this paint to the color of her face.
a. first select the eyedropper tool (I).
b. then click the area of the face shown below:
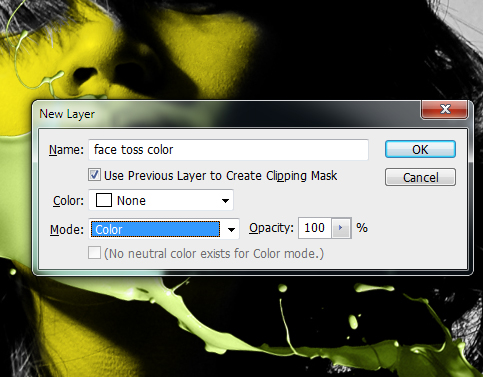
Create a new layer (shift+ctrl+N) and name it “face toss color”, check the “use previous layer to create clipping mask” and change the blending mode to “color”.
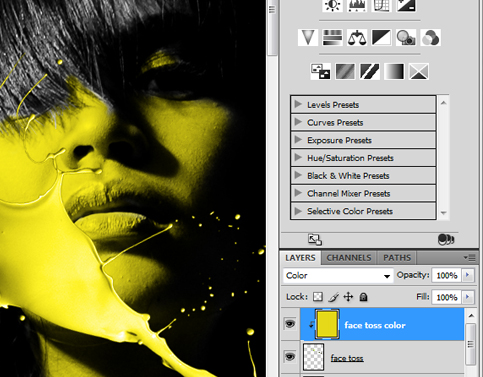
Now while your still in the “face toss color” layer, use the paint bucket tool (g) and click it into the artboard to recolor the paint toss so we can match it on the color of the face.
Now, we will erase some parts to complete the blending of the paint to its face.
Go to the “face toss” layer, then click the “add vector mask icon”, then change your foreground color to “black”.
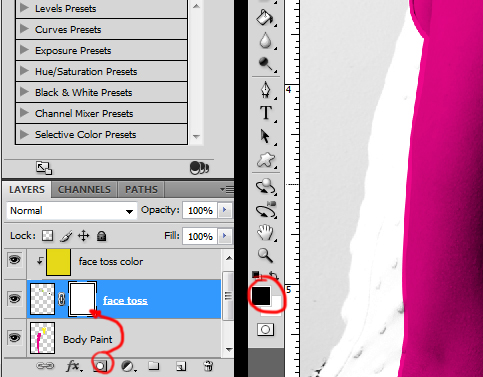
Then using a soft brush tool, (while the vector mask is selected) paint over the area you want to erase, to achieve similar result like the one below:
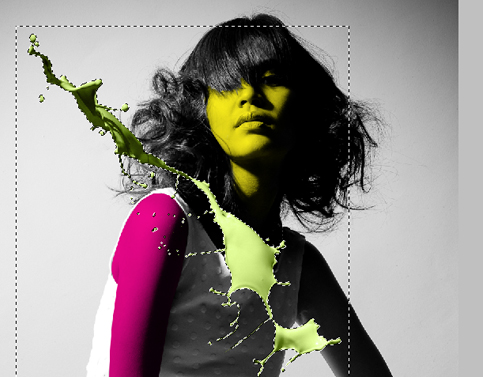
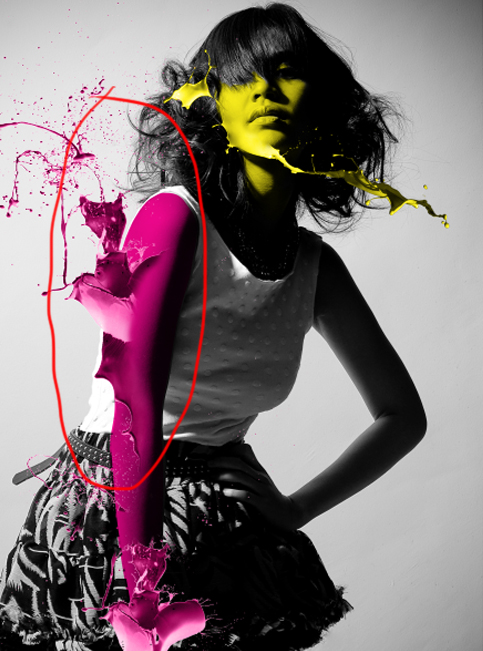
Now, with the same process, do this on the left arm using the file “paint toss no.16“
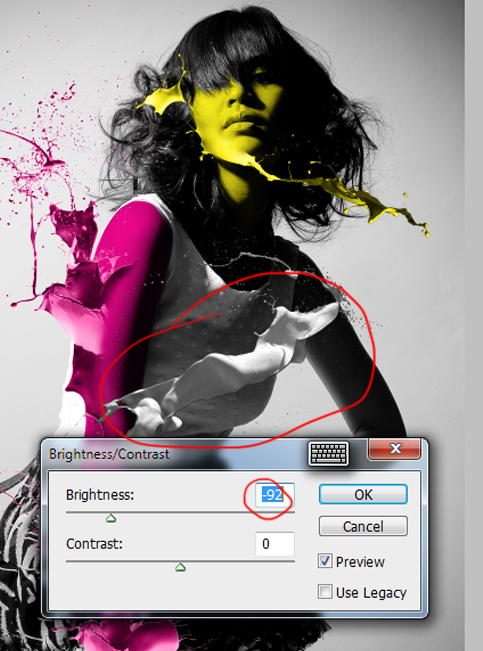
Now use the “paint toss no.7“ for the clothes. we need to adjust the brightness of the paint for about -92 to blend in with the clothes (Image>adjustment>Brightness/Contrast).
Lets add some flat black paint toss in the part of the hair. I used “paint toss no.9“

Then go to Layer>Layer Style>Color Overlay then choose the color “Black”.
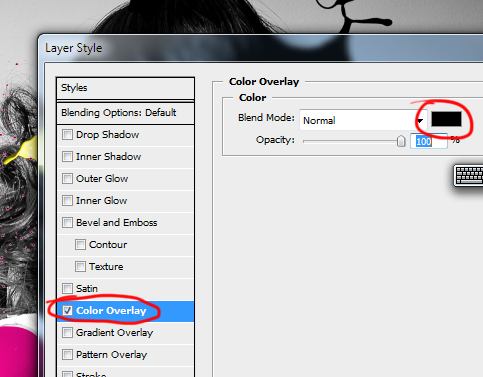
Erase some parts, using vector mask or simply use the Eraser tool. I just preferred erasing parts using vector mask so I can revert in back at anytime.
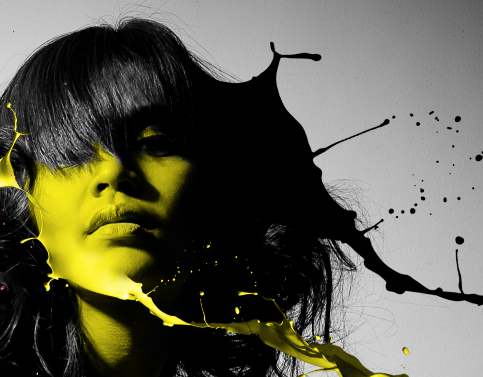
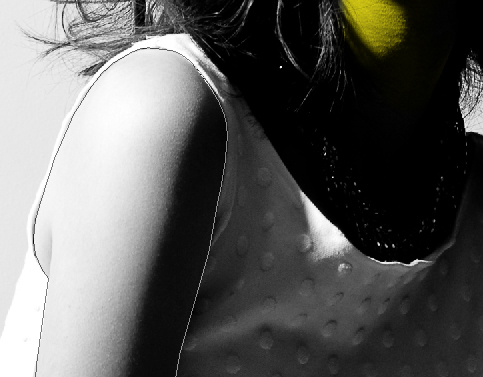
So here is the result so far:
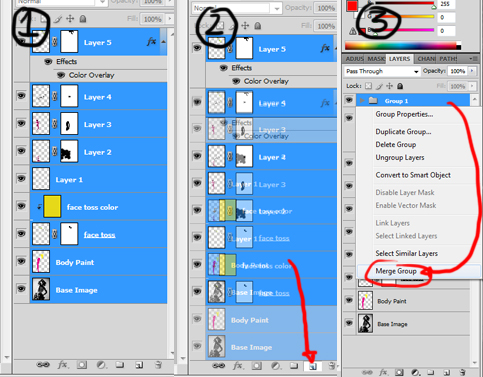
Part 4: Adding Shape Cut-Outs
Now let’s add some shape cut-outs. To do this we must first select all the layers, duplicate them, then merge them into one.
Go to Custom Shape tool and select the outlined triangle shown below:
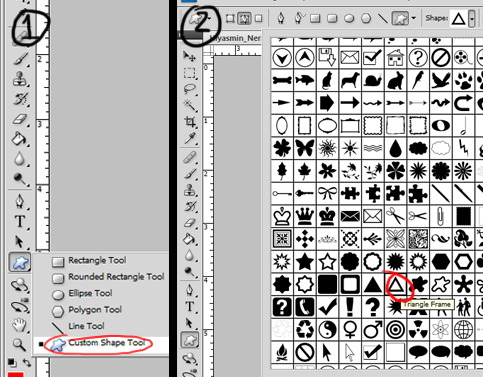
Then while holding shift, create a triangle, you can move your triangle
by using “path selection tool (A). Feel free to position your triangle wherever you want.

Then press Ctrl+Enter , then press Ctrl+j to duplicate, then move it to the right, then press Ctrl+D to deselect.
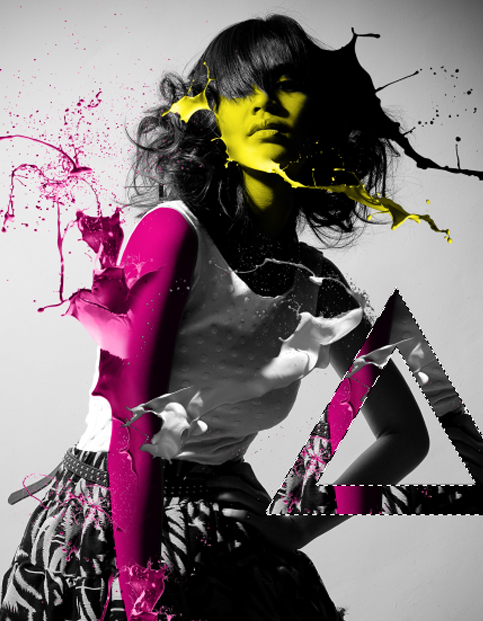
Do another triangle from the merged layer using the same steps and overlap it to the first triangle.

Then lets interlocked the two triangles, first while holding ctrl key, click the left triangle, a marching ant should appear. then go to Select>modify>expand then set it to 15px. then you should have a result similar below:
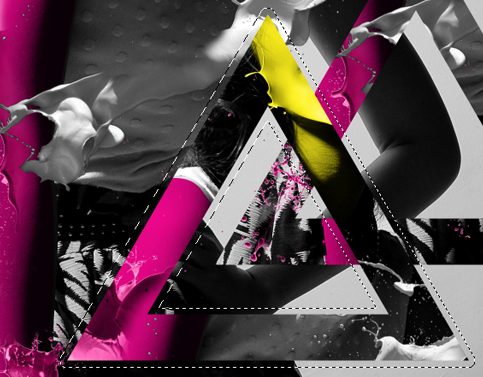
After that, select the right triangle layer, using the eraser tool, erase the part shown below:
Using the same technique, do this again, but you will start on the right triangle, then vice versa.
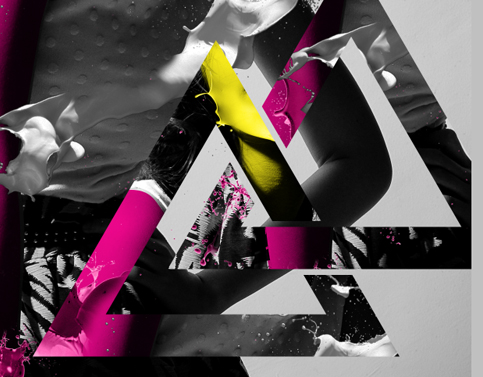
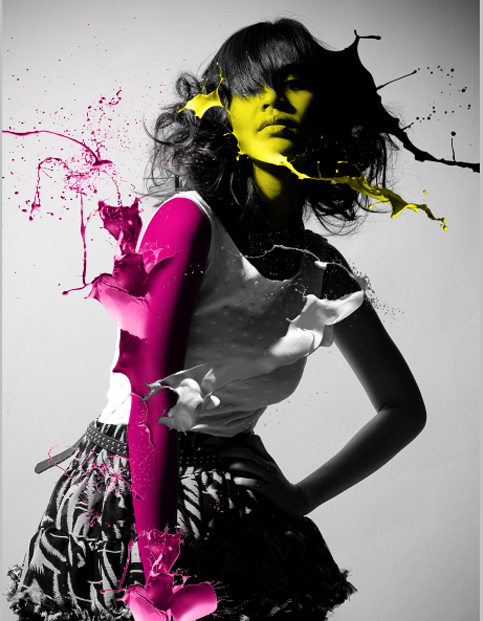
So here is what we have so far:
To finish things up, I just add some additional shapes using the same technique:
Yeah! Its finished! Go get your self a reward! (well if you want to add more its up to you). Hope you enjoy this tutorial, if there’s any question or any part which is not clear , just leave a message in the comments section and I will try to answer it.
Thanks for reading, cheers!
this is great! Thanks for doing the tutorial its been really helpful.
I’m defiantly using this technique in my A-Level course 🙂
Wow! Very simple and very nice 🙂
This was really good will try soon
cool and simple, i like those splatter effects!
i use them for lots of my photomanipulations which are available here:
http://www.moeyart.deviantart.com
thanks for the tutorial and the included PSD file!
cheers
This 1’s gr8.. 🙂
Thank guys! cheers!
Love the colors and textures.. Great!
Great Job, thx for share!!!
Great tutorial, thanks for sharing man!
MM More tutorials!!! Great stuff!
Nice one. Thanks. 🙂
Outstanding! Great job, can’t wait to give this a try!
This is actually easier than I thought!! Well done!
you are No:1 your post such a great and 1/10
Yusuf Bhai As Salaam Alaykum Kya Aap Hame Aisi Hi Kuch Sites Bata Sakte Hai
Love this tutorial and easy to follow! Im stuck and cant seam to figre out what im doing wrong. ive copied and grouped the layers but when i place the triangle shape and copy it, it doesnt copy the image within the shape. any help would be great. im a working with cs4 and dont know if maybe thats part of the problem. thanks for the great tutorial!
have you tried merging the grouped layers? =)
t
It looks totally awesome. Thanks a lot Heinritzh for sharing!
Great final result … Great work Heinritzh Sales … Nice touch with the splash on the page .. Thanks for the share 🙂
Thank guys
this looks great but when i try to color the “face toss” (in yellow) it looks matt/dull because the light is lost… how can i avoid that?
choose the blending mode to “color” hope this helps =)
it did 🙂 thank you so much this is really great! and actually the instrucion is easy to understand 😀
i downloaded the paint toss effects and opened them with photoshop but when i select then try to deselect it says “could not complete your request as the image is not directly editable, can someone help, it would be fully appreciated.
Can I Help U
cooooooo…l~
Thank you for sharing .. I wonder what you did with photoshop program. I Can CS4. I started a new
Hello
thks for this amazing tutorial! I’ve tried it once and succeeded!
but, i’m trying again and find difficulties on the triangle part and the Custom Shape tool (step4). As I want to make the seletion with the triangle (or any other shape like the puzzle for example), this is not translucid but colored with the foreground color. HELP !!!!!!!!
Really…..AWSOME…..thanks a lot :-))
This is fantastic!!! Its really great to see how you brought the different elements together. Am anxious to try it out myself.
Really thank you..
leukocreations.blogspot.com
I dont know how to get the Paint Splatters into my picture , please help
perfect job ! thank you for sharing with me…
Awesome, tried this and it looks fantastic!!
Cool idea… I will give it a whirl too… 🙂
This is wicked man,i lyk this
this is great! Thanks for doing the tutorial its been really helpful.
I’m defiantly using this technique in my A-Level course
i am stuck right off the start. lol, how do i paint while keeping the details of the original image but just changing the colour?
change your mode to: Multiply
Amazing job, congratulations, you will help me a lot to discover new techniques using “painting tossing”
someone also has the same tutorial but i dont know who’s the original see this link:
http://hollydotmedia.blogspot.com/2011/04/paint-splash-image.html
Thanks for showing us that. We were first but it doesn’t matter we are stoked to see people creating stuff even if it is ripped. haha!
Doesn’t look nearly as cool. lol
Thank You !! 😀 <3
very nice great job thanks for sharing…
the included PSD file was helpful
Woww,, what an amazing technique >.<
Thanks for sharing with us 🙂
amazing tutorial! however, I can’t seem to copy the image with the triangle. All it does is make another see through triangle. I copied all of the layers and merged them into one, so now I have all of the layers with the duplicated/merged one on top. What should I do?
So – So It’s Verry Old Technique But, Not Bad
Amigo, excelente pagina y excelentes tutoriales, habrá algún problema si publico en mi blog algunos de tus tutoriales? obviamente linkiando tu enlace directo también.
hi .. plz tell me the name of this software plz ….
Photoshop
Nice work Goooooooooooooooooooooooooooooooooooood & Thanx.
I used the Tutorial and the Paint Tossing Pack with another Model here: http://t-h-e-ocean.deviantart.com/gallery/#/d4bn32t
Thanks a lot!
I don’t get the part with the vector mask…
I went to face toss & pressed vector layer & took a soft brush & my foreground color was black.. But…
once it got white
once it got black
& sometimes it nothing happened.
You need to make sure that after you create the mask and select the brush tool that:
a) your foreground color is set to black
b) you click on the vector mask so you are painting the mask
c) that you use the brush to paint away the paint splatter where you want the skin to show through.
Hope that helps Sarah. Thanks for reading the tutorial and using it! Good Luck!!
it’s a nice work . I like it ! . Can I use some in my work ? . Thanks. x)
I like this site and I like this tutorial.
But… I get stuck on the triangle part. (just like a few guys mentioned above).
After I duplicated all layers, placed them in a group and merged them, I use the Custom Shape Tool. I create it while holding shift…. but all I see is the traingle coloured in my foreground color. When I press Ctrl+Enter and then press Ctrl+j … nothing happens.
How do I make this vector shape with the picture shining through??
Thanx a lot!!
Hi jay, does your action creates another layer? Ir yes, Using the move
tool, move it to any part of the canvass.
Thanx a lot Heinritzh. I found out that it’s important as well which option you choose on the RIGHT of the shape you choose (the triangle in this example). There are 4 icons and I chose the 3rd one (i don’t know the name, because I’ve got a Dutch version)… and that worked for me.
Thanks for this great tut!
I can’t seem to delete the black background from the number nine image of paint toss without having to rasterize it first. It says, “…smart object is not directly editable.” But once it’s rasterized, I can’t fill it with the yellow paint anymore. 🙁 Help.
I am having troubles with the triangles as well. When i hit ctrl+enter, ctrl+J it creates a new layer and the triangle is no longer selected with the ‘marching ants’ and i cannot select it anymore so i’m not able to make both the triangles interlock, though i can move it around with the underlying image. Also When i create the triangles i have paths and intersect path areas selected i don’t know if this matters.
Your tutorial is awesome….a lot of idea
Thanks a lot
Too gud n too easy to get nice work with simple technics.Thanks a lot.
Too gud n too easy to get nice work with simple technics.Thanks a lot.Now send me gud tutorials if any one have
ive learnt alot but stuck on the adding shape n cut, its not letting me do anything n am using cs5 am sure there is somthing missing in the step???
any help????
Very help full to me , thank you .
Nice tutorial, ^_^ learnt a lot 🙂 Are we allowed to post what was the end result when we followed the tutorial 🙂
Glad you enjoyed…we would love to see your work too so please share!
Thank you for sharing this tutorial, i’ve learned a lot from it.
Btw, amazing website..
Happy holidays and all the best for next year…
Kind regards from Belgium
Really a creative and excellent work. Keep it up. Thanks to share with us this amazing tutorial.
Hello,
tanks a lot for this awesome tutorial, but I’ve got one question. How have you selected the paint tossing, because when I only use the magic wand it’s not exact enough. So could you explain your method and way of making the selection?
Thank you very much 🙂
stuck with part 3. SMART OBJECT IS NOT DIRECTLY EDITABLE this is what i am getting and if i rasterize than i can not have that yellow color……please please please help…………. :'(
Lot of Photoshop tutorials I have read on photoshop paint splashing effec. I am really impressed to this tutorial. I just want to include one thing “Without excercise, practise and experience, the talent is of no use” and You did it. Thank you
Hey, cool photoshop tutorial. Just tried doing this of my own and because I use a Apple Mac, it would delete the paint splash 9’s background and I was wondering if you could back to me on how I can fix this problem. (P.S. It says this smart object can not be edited.)
I’ll leave my Deviantart link here for you; http://randomcookiecx.deviantart.com/
And my email, please message me on either one. maddymatty10@gmail.com
Kind regards, RandomCookieCx.
Oh…dnt know how much happy iam.cuz have been looken for ways to get tru on photoshop.now am there.ok my problem is how do I get those paint tossing park….pls kindly help me out
On section 3 – face paint toss colour I get the following message when trying to use the magic wand “SMART OBJECT IS NOT DIRECTLY EDITABLE”. I found a fix for this online (rasterize the layer) but using that fix then seems to affect the colour and I definitely can’t use the brush tool to blend – I just get the original colour coming through. Can anyone help?
nice tutorial and easy to learn
lovely and helpful photoshop tutorial for splashing effect and part to part details .I love this very much
Thenks
thanks a lot for your tutor :))
many thanks , its pretty easy to learn and very creative.
Awesome Art work I Like U R skill after 1 mount i’ll donate u some money Thunks for giving these for free
My God !!! Just going to create of my own Paint Splashing Effect 🙂 🙂
Excellent work Splashing Effect Into image . Its really awesome & creative. Thanks
I have been able to experience this wonderful work like a great artist.
Thanks for sharing