

Incorporating lighting effects is a great way to bring energy and flow into your designs. In this tutorial, I will show you how to create some amazing lighting effects from scratch using a free open source program and then adding final touches to the image inside of Photoshop.
Required Resources
Download the Resources (Includes the final PSD)
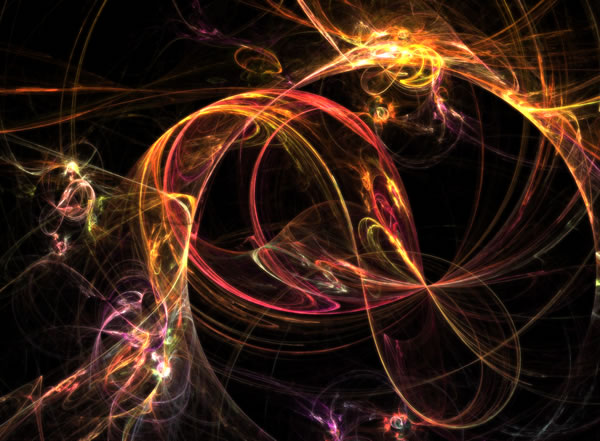
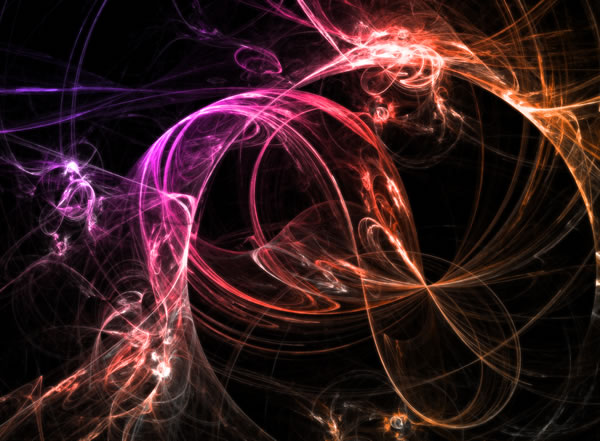
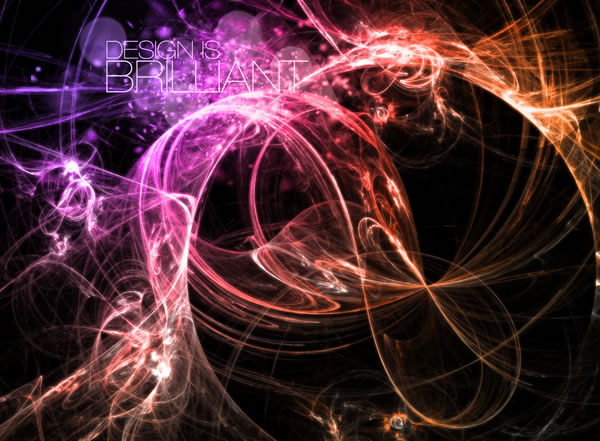
Final Image Preview
Take a look at the design we’ll be creating.

Step 1
To start off this tutorial you will be creating the main glowing object using a program called Apophysis. You can download it for free here
Note:
If you would like to skip the creation process using Apophysis, I have included the rendered output in the resource files. Skip to Step 8 where we open the rendered file in Photoshop.
After you have downloaded and installed Apophysis. Open the application from the Windows Start menu.
Step 2
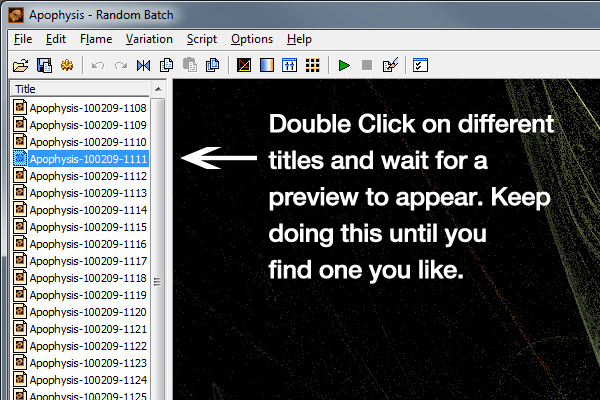
In the left hand panel of Apophysis, double click on different flame titles until you find one that you like. Try to find ones that don’t have a lot of noise and could look like a great glow effect. These are all random batches. Don’t worry if it doesn’t look perfect as you will be rendering the flame and bringing it into Photoshop later.
Step 3
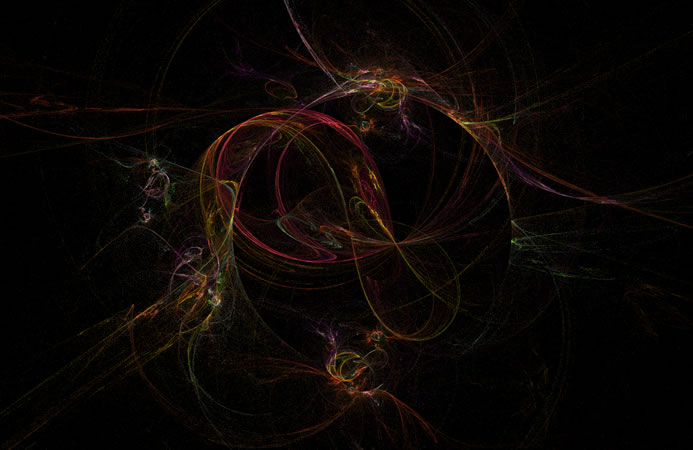
Hopefully you found a good flame to use. The flame I choose looks like this:
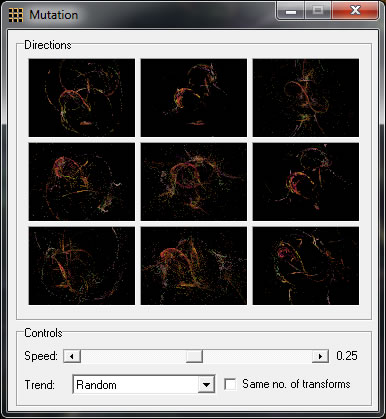
Tip #1: You can mutate flames.
If you would like to keep the same look yet get a different result go to View > Mutation and click on the different squares.
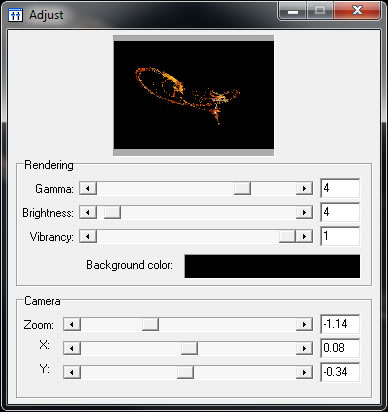
Tip #2: Try Zooming in and out
If you find a look that you like but it is out of frame or you would like to zoom in. You can go to Flame > Adjust and edit the camera Zoom.
Step 4
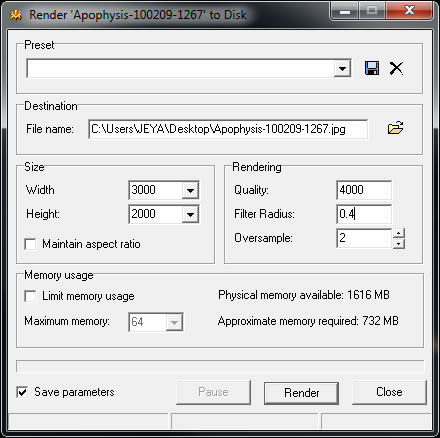
Once you have perfected your flame, go to Flame > Render to Disk.
Width 3000
Height: 2000
Quality: 4000
Filter Radius: 0.4
Oversample: 2
Finally click on Render. Rending takes some time, so just sit back and relax.
Step 5
Now that the render is finished, open your rendered JPEG into Photoshop. If you would like to use the file I rendered out, open Render.jpg in the resource files for this tutorial that you downloaded.
Duplicate the Background Layer.
With the Duplicated Background layer selected, go to Filter > Blur > Gaussian Blur. Change the Radius to 4 pixels.
Set the Blending Mode for this duplicated layer to Linear Dodge (Add)
If you feel like you want some more glow, then duplicate it one more time. You can also play with the Levels to get a crisper look.
Step 6
We are going to create a brush out of this render. Choose the Rectangle Marquee Selection tool and in the Options Bar change the Style to Fixed Size. Change the Width and the Height to 2500 px

Step 7
Click in an area that you would like to make a brush with. Since we changed the options to make the selection exactly 2500 x 2500 it will constrain to those exact dimensions.
Step 8
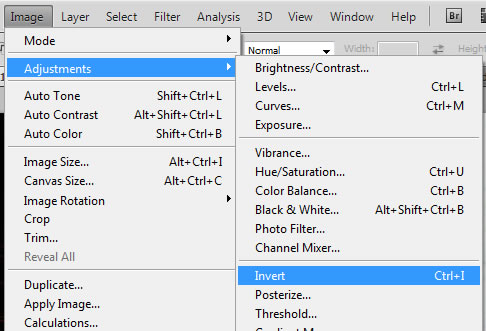
Go to Image > Adjustments > Invert
Step 9
Now that we have a white background we can create a brush. Go to Edit > Define Brush Preset
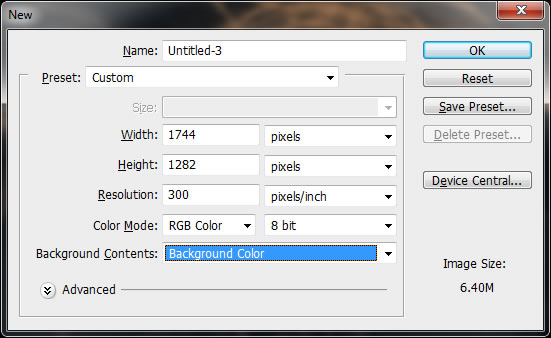
Create a new Photoshop Document. I created it at 1744 x 1282 with the resolution set at 300 ppi.
Step 10
Make your background layer is Black and Create a New Layer. Choose the Brush tool and select the new brush that we just created. Click in your document to lay down the pixels. Name this Layer Glow Brush
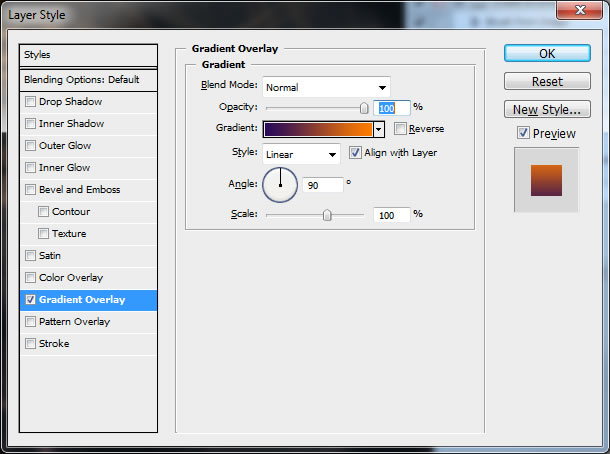
Double Click on the Glow Brush layer to bring up the Layer Style window. Check Gradient Overlay and edit the gradient to be the Violet, Orange Gradient.
Step 11
Go back to your original JPG that you rendered out of Apophysis and Copy and Paste it into this new PSD. Name this new layer Original.
Change the Layer Blending Mode of this layer to Linear Dodge (Add). You will have to use the Move tool to properly align this Original layer with your Glowing Brush layer.
Step 12
Create a New Layer above the Original Layer and name it Colorize.
With the Gradient tool, select the Violet, Orange gradient again and choose Radial Gradient. Make a gradient that resembles something like this:

Step 13
Now change the layers blending mode of the Colorize layer to Hue. You should end up with this:
Step 14
Now we are going to add some text into the design. Add the text DESIGN IS BILLIANT. For the font I used Helvetica Neue – Ultra Light Extended. For the color I used – #ffca53
Make sure this text layer is right above the background but below all of the other layers.

Step 15
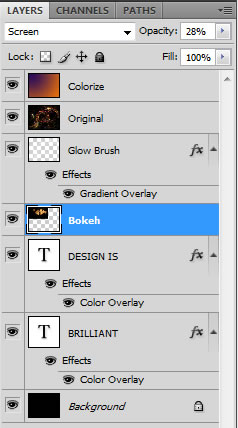
Open the Bokeh image from the resource files into Photoshop. Copy and Paste it into your PSD and place the layer above your text. Change the layer blending mode to Screen and the Opacity to 28%
You will want to Scale the Bokeh layer down to fit nicley with your text.

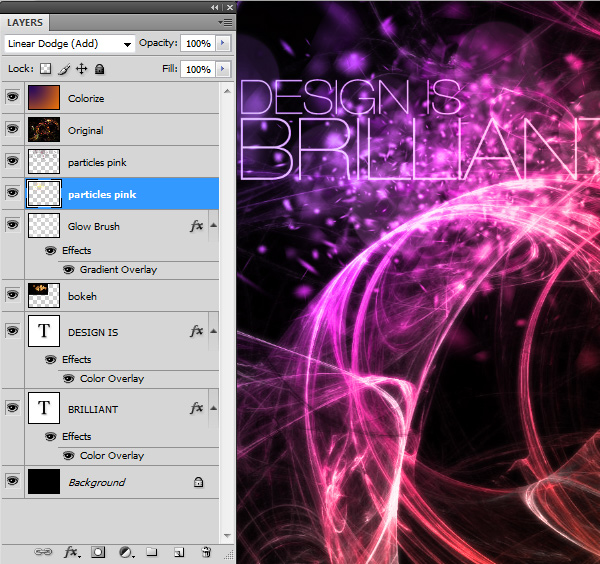
Step 16
Open the Particles – 9.jpg file and Copy and Paste it into your PSD. Scale it down and place it just below the Original Layer. Change the Layer Blending mode to Linear Dodge (Add). Name this layer Particles Pink
Duplicate the Particles Pink layer and change the layer blending mode to Overlay.
Step 17
Create a New Layer just below your particles pink layers. Using the Elliptical Marquee Selection Tool, create some solid white circles in your document.

Step 18
Now change the Layer Blending mode to Soft Light. Name this layer Circles – Soft Light
Step 19
Finally, I decided to crop the image since the right hand side was not too appealing. You could easily add some elements over on the right side and bring it all together.
So that’s it. Have fun with your new tool!

Great Tuto, thanks a lot.
The outcome is great. thanks!
Thanks for your freebies and this tutorial. I will download Apophysis and use this tutorial for first steps. I linked this page on my blog.
Great tutorial. I love Apophysis and have used it to create some great lighting effects. I always love to see how other people create things. THX!
@JC – Thanks! Send me some of your work using Apophysis. I would love to put it in our Get Inspired posts.
Brilliant! Thanks for sharing 🙂
Another excellent tutorial! I was sad to see that Apophysis is a Windows only program, but I did some searching around and an application called Oxidizer exists for Mac users. I can’t vouch for it’s quality, but its out there.
@Ashley B: I am glad you like the tutorial. It really is sad to see that Apophysis is windows only, I guess you could just use Boot Camp? Thanks for letting us know about Oxidizer. I will have to check that out.
Brilliant,very nice!
thanks for this good tutorial. and @ashley thanx for mac help.
OMG! Looking for a flame generator for a long time. Just perfect!
Seems there’s a Java port of Apophysis for Mac. Going to try it tonight:
http://www.versiontracker.com/dyn/moreinfo/macosx/34092
hooooooooo…awesomeeee…thanks for tutorial brotheerr…. ^____^
apophysis takes so long to render to disc apart from that all is good
@Steve C: Yeah it takes FOREVER! I usually render my images out double the final size to get better quality. Say good bye to your computer when your doing that. There are ways you can random batch render the files. So you could let it render overnight and then check out all the images it rendered in the morning. That’s actually what we did for the Wisps Pack. That saved us so much time.
thanks i have a question though as im new to apophysis my render has completed but nothing appears to be happening it just says stop or pause but i dont want to cancel it having waited so long for it
@Steve C: That’s strange. Right below the Pause button does it say how much time is remaining?
I have the same problem and it says that the time remaining is all 0’s
I checked the file and clicked preview and open but it says that its an empty file…
Btw this tutorial was an Awesome help ty!=D
Also where does it save the file to?
It defaults to where you last saved. Mine is on my desktop. If you open the Render To Disk window again you can see where it is saving to by looking at the Destination File Name. Your other file that you rendered is probably in that location as well. Hope that helps.
the lighteffekts are great
Media Militia design sniper: One post…One target.
The website for Apophysis was down when I tried to download it; you can download it at Source Forge here: http://sourceforge.net/projects/apophysis/
Thanks for the link. I am sure other people will find this very valuable.
I followed this and realized that if you save as a .png file rather than a .jpg then you don’t have to make the brush presets (if you want the brush for later then do that step), as the png file already has a transparent background.
Sorry for the double-post
@Josh: Thanks man. Did you use the beta version? If not, what version are you using? I believe only the beta version you downloaded off of sourceforge has transparency support with PNG files. Transparency makes this program even more useful.
lol, I have no idea really – I downloaded my copy from the Source Forge link I posted above – It says it is version 2.09 if that helps. I don’t see anything about beta though, so maybe it’s a newer version…
Yeah, 2.09 is currently a beta version. The current version is 2.02. I have started to use 2.09 and I am loving it. Hope the tutorial helped you. Thanks for all the info as well…
The tutorial was VERY helpful! thanks again!
Hi!, thanks for you tutorial, but… the image that you used (into document PSD )have more color than Rendered.jpg into zip. The brush is not the same, the brush is “fine” and your brush is more white “strong”. Can you help me please?
Sorry for my english
You are absolutely correct. There was a missing section at Step 5. I have updated the tutorial. Thank you for bringing this to my attention.
Ah, yes after re-reading Step 5 I see now why my results weren’t as bright as yours here – Thanks Shixel for catching that and Thanks Jeya for correcting it!
thats a good program – they should release it as a plugin for PS so teh mac fans can have a go – Ill try and use this in my next project : )
Very helpful! thanks Jeya
Thank you! I am glad you found it useful. Take care.
Vauuu! This is really great! Media Militia rocks!
HAy, one question: Why must the Quality be 4000? IM german 15 years young boy and my english isnt good. Maybe i havent read something, but when i make the pic from Apophysis in 200 Quality looks it nice, but when i make it in 1000 Quality is it the same. Can you maybe help me?
To be honest… I have always read that you should render it out at 4000 quality. But if yours looks good at 200 quality, I would just keep it at that. Less rendering time.
It looks beautiful! Very cool lighting effect!
I don’t see that you’ve fixed the step where we make a brush. I had to merge the two layers before Image > Adjustments > Invert before it would work. Otherwise it was making it just a white block.
Very nice and thank you for showing me Apophysis
thnxxxxxxxxxxxxxxxxx alot
this program very nice
perfect….
Jeya,
I am impressed with your tutorials.
I am using CS2.
Can you please confirm whether these tutorials are only for CS3 and above, as I could not see options like Linear Dodge (Add) in my options?
Thanks a lot….
Photoshop CS2 has twenty-three layer blend modes including Linear Dodge.
In your Layers panel (Window -> Layers) is a dropdown menu that defaults to “Normal” – click this to see all the choices for blending modes for each selected layer.
in Apophysis, after choosing an image, i go to Flame > Render to Disk then do the appropriate settings. After that, when click the Render button, a small window pops out and says “You do not have enough memory for this render. Please use memory limiting.” is it okay to check the Limit memory usage box? And I don’t know if this would help but my disk space is exactly 9.24 gb. please help me. Thank you.
Also, it says there:
Physical memory available: 344 mb
Approximate memory required: 732 mb
i am trying to save the file at a folder in my Pictures folder.
Thank you.
Lauren,
It depends on how hard your system is running and how much RAM you’re using.
Go ahead and limit the memory used as it suggests; it will work fine, just take a little longer to render.
Note that memory is not the same as disk space.
Amazing!! Wow 😀
i like the final design, i have tried following the tutorial but its not working for me.When i try to define the brush,its not highlighting to create the new brush…………..!!!!
How did you make the lines layer? And link it to the bokeh?
@John: Do a search in Google for “45 Degree Lines Photoshop” for some tutorials. There are a ton of different patterns out there you can download as well.
As for linking it to the Bokeh Image, it was done by ceating a clipping Mask. Just make sure the lines layer is above the bokeh and choose Layer > Create Clipping Mask. I then set the Layer Blending Mode to Overlay.
Hope that helps!!
Sure did! 🙂 Thanks
Been using photoshop for years but never really used masks alot. 😀
I was a O’ Level student instead of a professional artist nor art student but I have a lot of love in artworks since I started to use photoshop, some of my artwork is found in my website. I do not have much experience (2 years) or knowledge in artwork. I can handle this whole tutorial but was frown for the apophysis… It takes too long to render even 1440 x 900 px… I have a computer with 3GB of RAM and a Intel intergrated graphic chipset… I think its the graphic chipset caused the slow render ?
great tuts
very helpful, and Apophysis is great applictoin
thanks again
hey
in step 9 im trying to define brush,but there is an error appearing of selected area empty.
what should i do here
thanks
Can you explain in more detail? What does the error say?
Tutorial added to thewebtuts.com
Hello ermm on step 11 it says “Go back to your original JPG that you rendered out of Apophysis and Copy and Paste it into this new PSD. Name this new layer Original.” Can you tell me how to do that? i don’t have a clue how to.. please explain , Thanks
Rendering a flame out of apophysis has already taken 18hrs and is scheduled to continue for the next 539… …approx three weeks. How do I fix it?
thanks for sharing
when i did as you said my pic’s Quality was
so bad .maybe ,it’s because
when i render to Disk i set the Quality‘s value too low but when i set it to 4000 i think i have to wait for a whole day
wow… nice tut…!! thanx for your tut
Hi, thanks for your tutoriel, but i have few problems:
1) The blurred duplicated background must be used with the ‘linear dodge + ” blending mode ( densité linéaire + in french), but, when i do thi, i just see few pxels on a black background…
2) Do you merge two ones before making a brush?
Thanks a lot!
3)
Thanks so much for this!
Beautiful. I’m relatively new and wonder if this can be done in PSE 8 or only in Photoshop? Thank you.
Very interesting tut, thanks for putting it up!
hi, great tutorial!! 1 question you now if Apophysis is compatble whit windows 7
Saludos =)
I must say its a great help & tut.
soooo great, thaks!
I’ve been searching all over for how to do this!
Now I’ve spent hours trying to translate these steps for PSE8…
Can anyone help? Ugh.
Amazing … I’m downloading it 🙂 I’m hope I can create great designs like yours – Cheers, Kathleen
thx for the tutorial…
Thank u for posting.
cool program! and very cool tips, thanks. This is what I came up with http://korruptninja.deviantart.com/art/Design-my-Life-1-254541201
TO SIMPLE! 🙂
I want to try this, if only there was a gimp version of this.. :{
Very good tutorial. Only one problem..it doesn’t work for me.
I can’t define the brush! Please help, I would really like to try this! =)
This is awesome. The tutorial is spot on and has helped me create some really incredible pieces.
Thank you.
Love this tute, I cannot define the brush area as stated in Step 9. The option is greyed out.
Thoughts?
This tutorial is inspiring and gives me courage and encouragement to pursue more graphic related projects. Thanks to people like you, some of us out here who feel somewhat lost, can go ahead and move forward in our progress. Where would we be without you? Thanks again for this excellent resource and I can’t wait to try out this lighting effect!
Wow…nice tutorial. Very helpful. Thanks so much!
The tutorial is sooooooo great! Thank you so much for this! I did follow this to create several other colors version.
Excellent tutorial. I used it here http://luissuarezfan.deviantart.com/art/Mi-idolo-Luisito-El-Pistolero-en-Uruguay-439522787. Thanks very much for sharing this tutorial. It helped me alot.
The current link to the apophysis software is located here:
http://sourceforge.net/projects/apophysis/