
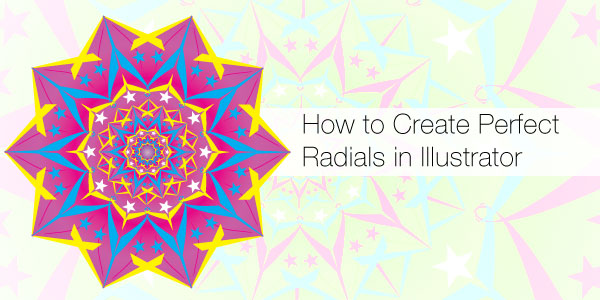
One of our latest design packs that we just released contained 50 different styles of radial shapes. We received a good amount of feedback and questions on how we created them. In this tutorial, I will walk you through the creation process on how to effectively recreate some perfect radial shapes. Once you have completed this tutorial. I am sure you will be creating some amazing radial shapes to include in your designs.
Step 1:
Open up Illustrator and create a 3000 pt by 3000 pt document.
Step 2:
Next choose the Pen Tool.

Step 3:
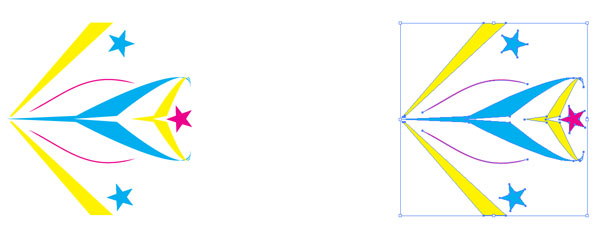
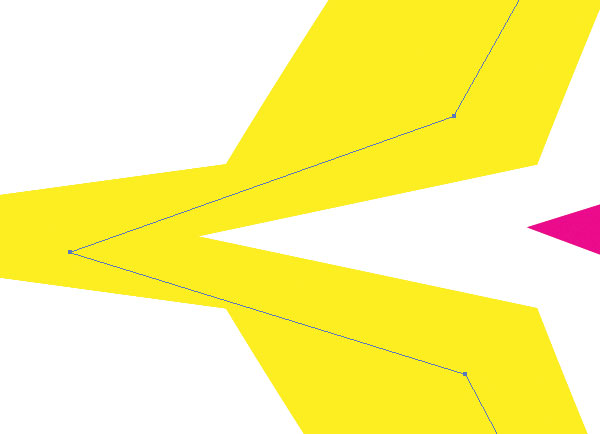
Using the Pen Tool, draw a unique shape. Here is the shape I came up with. You can come up with any shape you prefer. I also incorporated some stars using the Star tool.

Step 4:
Using the Direct Selection Tool, select some of your shapes and change the color.

Step 5:
Select all of the shapes with the Selection Tool and go to Edit > Copy
Now deselect everything by clicking in a blank area of your artboard. Choose Edit > Paste in Front. This will create an exact duplicate of your shape. Now without deselecting the copy, use the right arrow key and move the shape over to the right. Give a good amount of space in between the two shapes.
Step 6:
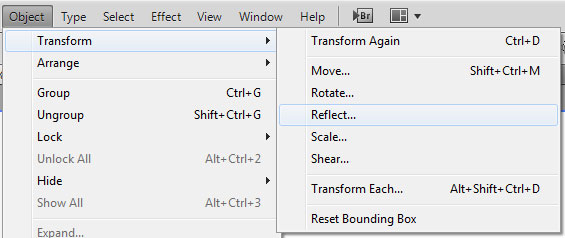
Now go to Object > Transform > Reflect
Step 7:
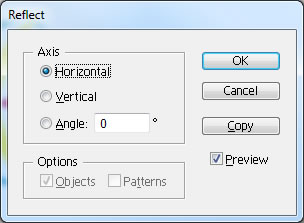
Select Horizontal for your Axis to reflect and click on OK
Step 8:
Now go back to Object > Transform > Reflect and this time choose Vertical for your Axis to reflect and click on OK

Step 9:
Using the selection tool, select both of your shapes and go to Edit > Copy. Then go to Edit > Paste in Front
Finally go to Object > Transform > Rotate
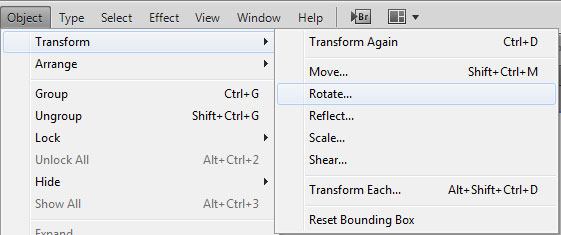
Step 10:
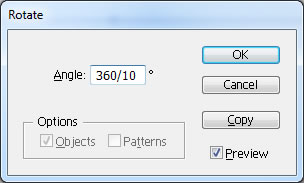
This is where the fun starts. You can put in a simple division equation into the Angle box. I choose to put in 360/10. Then click OK
This will rotate both shapes 36 degrees.The reason I use the put in a division equation instead of 36 degrees is because it will create a perfect radial that will line up when you are finished.
If you are not happy with the preview, try a different angle.
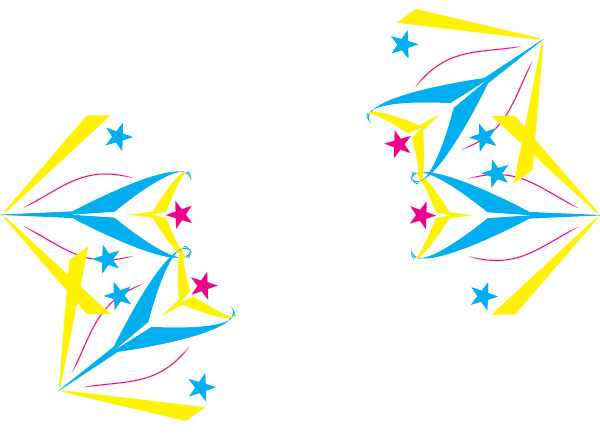
Step 11:
Keyboard shortcuts come in very handy at this point. With the copied rotated copied shape still selected, press CTRL + C then CTRL + F then CTRL + D.
Those keyboard shortcuts do the following:
CTRL + C = Edit > Copy
CTRL + F = Edit > Paste in Front
CTRL + D = Object > Transform > Transform Again

Step 12:
Now that you have a finished radial, you can end here or add more to it. If you would like to make the radial more complicated, then continue reading.
With the Selection tool, select the whole radial and go to Edit > Copy. Then Edit > Paste in Front. Now Scale down the copy so it is in the center of the first radial.
Step 13:
Now let’s add more color into the radial where the white space is.
Using the pen tool, trace around the yellow areas of the inner part. Make sure you close off the path.

Step 14:
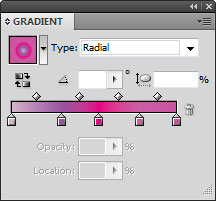
While the outline shape you just created is still selected. Open the Gradient panel (Window >Gradient) and choose Copper Radial.
This should apply a copper gradient. Obviously it does not go good with our previous colors. So click on each of small color boxes and change the colors to shades of pink.

Step 15:
If for some reason your gradient shape is above some of the radial shapes, select the gradient and go to Object > Arrange > Send to Back.
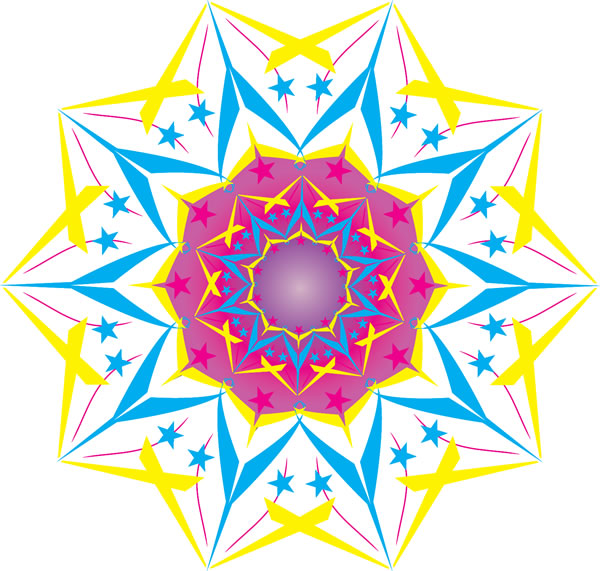
This is what you should have now:
 .
.
Step 16:
Now we want to fill in the other white areas as well. Using the same technique above, create another path with the pen tool on the outer most area of your radial.

Step 17:
Now select everything with the Selection Tool and choose Edit > Copy. Then go to Edit > Paste. Now Scale the copy to the center of the radial and you’re finished!

Sweet tutorial!
You guys totally rock – thanks for this.
Really nice tutorial. Thank for sharing.
Great tutorial jeya. I already created 5 sick ones!
Nice! I would love to see what you created. Hit me up at contact@mediamilitia.com
Great post :-), just what I need
Great tutorial!
Can’t wait for a new one. Thanks for sharing!!
Thank you for a wonderful explanation exercise
I like that you do carefully all the steps
thanks a lot!! can use this in one of my class here in the Philippines.
keep it up bro!!
This is amazing tutorial, thanks a lot!!!!!!!!!!!!!!!
Thanks for the tut, Jeya, but there is an easier and more controlled way of doing this: group the set that you want to copy; go to \Effect\Distort & Transform\Transform; change the rotate value to 36º, copies to 9 and anchor point to left-middle; check the preview option and voilá!
It is simple, easy and you can always double click on the group, edit it, and the changes will be reflected on the copies
Awesome! Thanks for the tip. I will have to start doing it your way.
and there is an even better better way…
.
use the appearance palatte full function. just draw the half of anything you want reflect… all left point should be on one line. group/ transform reflect / another transform rotatet with copy…
…
save the crap as a graphic style and you must not repeat this crap till your end of live. if you like to use this on things in a group with different colors so you have to create a graphic style which not affects the color and outline.
.
hurray
A wonderful afternoon jeya!!! how nice the blog you have posted..that was definitely cool, it widens our mind!!thanks for the tips!!keep it up!!
The excellent lesson, has learnt a lot of new, thanks
its …………work
This is greatful!!
I have created it by CS3. I havn’t found cooper gradiant option.
Waiting for new content.
Best of luck!
Great tutorial. I pulled off something really cool with this. Thanks 😀
Thanks for the tutorial it was really useful! Just a couple of questions – I am a complete beginner in Illustrator and I’m still getting used to using the pen tool. The only real shapes I was able to create to work with were triangles and flares (using the flare tool). Any tips on how to create cool shapes that would work well with these kinds of designs? Also any tips on using this technique to create kaleidoscope type visuals or Yantra style images? Thanks! 😀
Thanks for the tut, Jeya, but there is an easier and more controlled way of doing this: group the set that you want to copy; go to \Effect\Distort & Transform\Transform; change the rotate value to 36º, copies to 9 and anchor point to left-middle; check the preview option and voilá!
It is simple, easy and you can always double click on the group, edit it, and the changes will be reflected on the copies
Great idea, thanks for the tip!