
Today we have an amazing tutorial on how to create some very evil, bloody, gory text that even has snake horns and skulls in it. This tutorial includes a video, just in case you don’t understand how to do something or you just prefer to watch me do it. You will learn some exciting new techniques that you can use on your next dark design or Halloween poster.
Before you start, make sure you download the ZBrush trial from Pixologic. This program is so much fun and extremely easy to use. We will use this program to create the text. Don’t be afraid that it is a trial. It is free and the features are fully enabled. Once you get done with this tutorial, ZBrush will be your new favorite tool. Let’s get started on creating the text!
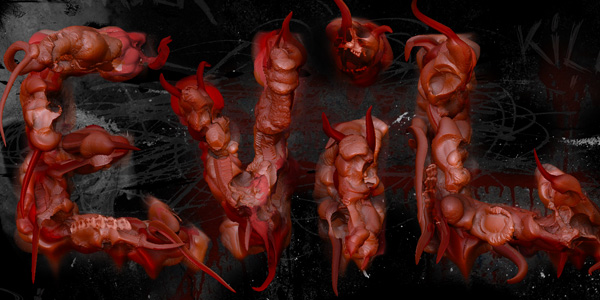
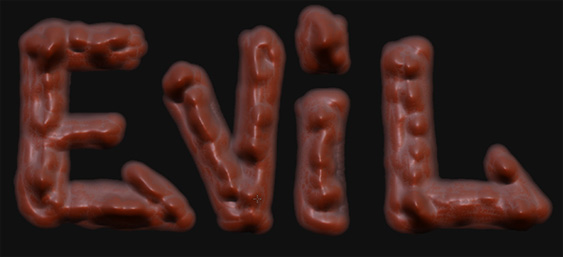
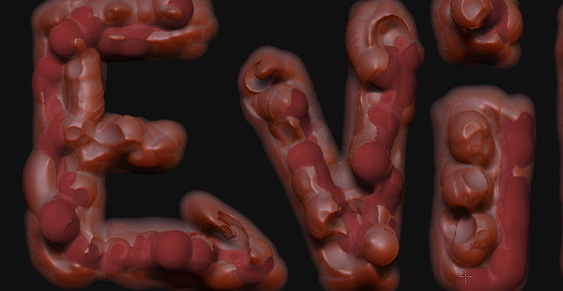
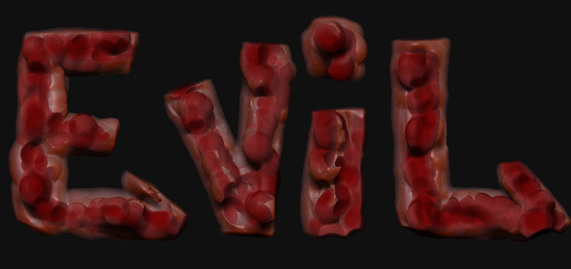
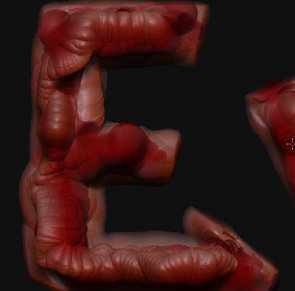
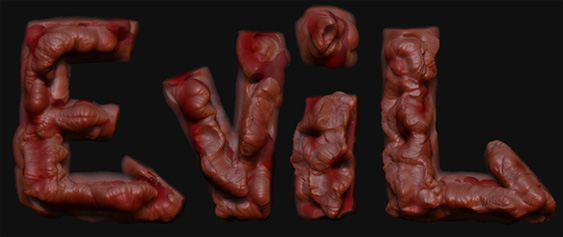
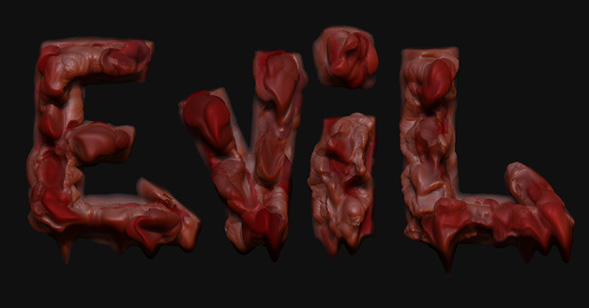
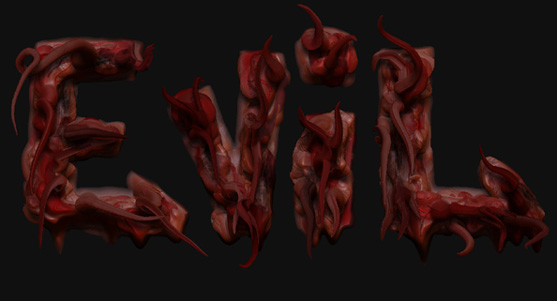
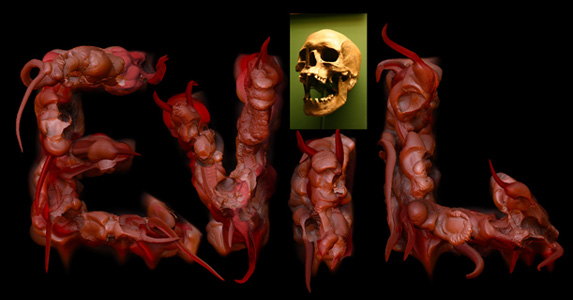
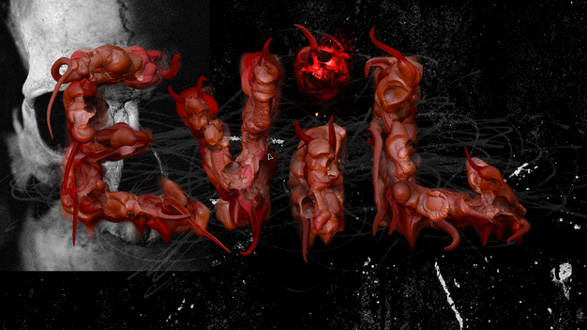
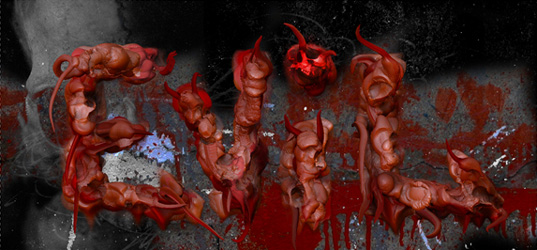
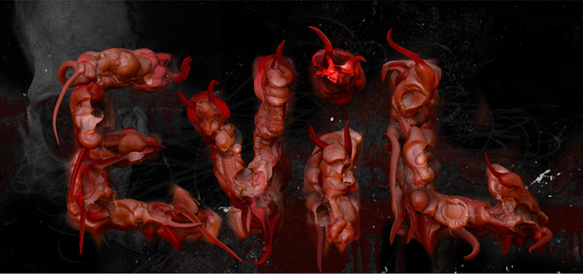
Final Image Preview
Click here to check out the larger version. It looks a lot better.
Required Files
- Skull 1 (Stockvault.net)
- Skull 2 (Stockvault.net)
- Dirty Wall (Stockvault.net)
- Other Misc Resources (Media Militia)
- Download ZBrush Trial (Pixologic)
- Download the final PSD (Optional)
Video Version
This video tutorial covers everything in the text version below but as a neat video.
Text Version
Step 1
Open up ZBrush and click on Other (or press esc)

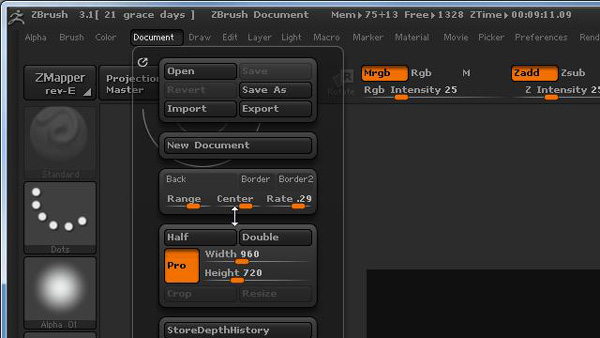
Step 2
On the menu, go to Document then choose Double.
Step 3
Since we enlarged the document size we need to see it all. Click on the Zoom Tool and Drag up to show the whole canvas.

Step 4
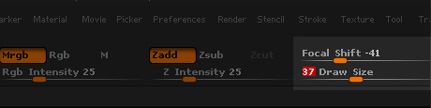
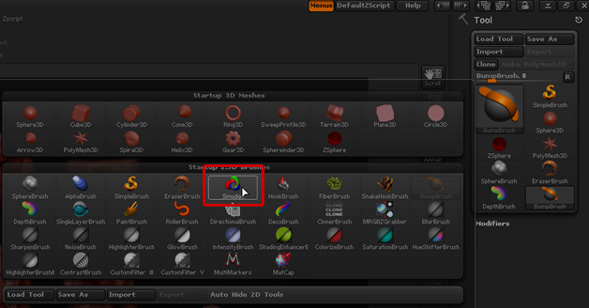
In the Tool panel. make sure your current brush is the Simple Brush
Change the Focal Shift to -41 and the Draw Size to 37
Step 5
Make sure that the MatCap Red Wax material is the currently selected material

Step 6
Now on your canvas start drawing out your letters. Make them block style letters. Go over the letter multiple times to build depth. Try wiggling your mouse around in certain areas. Your first letter should look like something like this:

Step 7
Continue finishing your other letters. Try to keep the same look for all of your letters. Play around with adding more depth.
Step 8
Now hold down the ALT key and start brushing over parts of your letters. This will decrease the depth in the areas you paint. You want to create a bumpy look.
Step 9
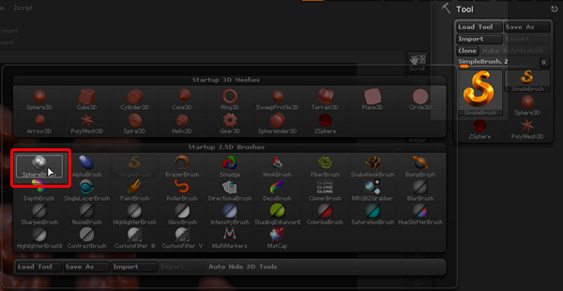
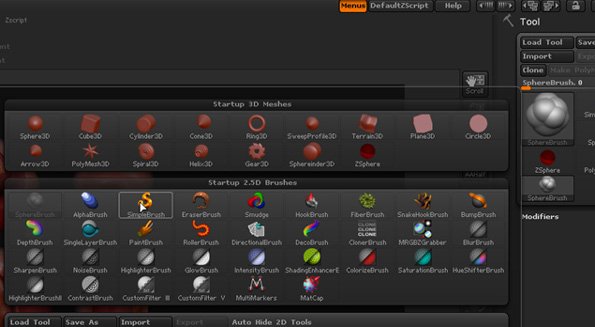
In your Tool panel, click on the current brush (Simple Brush) to open the flyout of 2.5 Brushes. Select the SphereBrush
Step 10
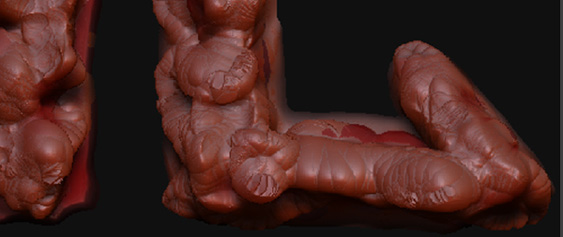
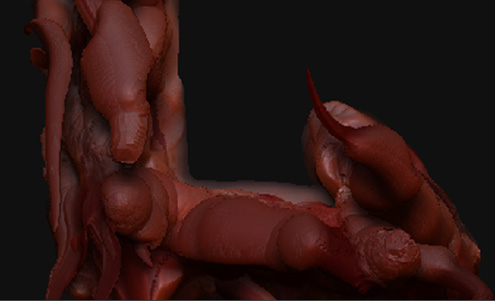
Now go back over your letters with the SphereBrush. Make it look chunky and meaty. Once you are done adding spheres go back over them holding down the ALT key. Wiggle your mouse around in certain areas. Here is what it should look like:

Step 11
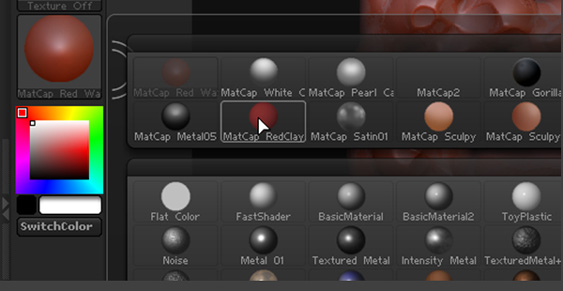
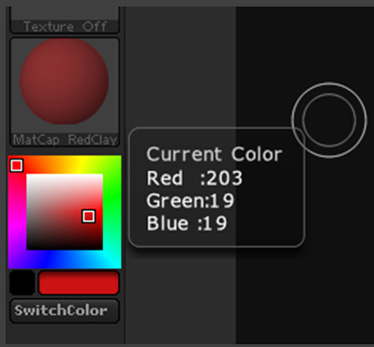
Now click on the current Material to open the material flyout. Choose MatCap RedClay
Step 12
Go back over you letters just giving it a little some more depth and color.
Step 13
Now choose a brighter red in the color picker.
Step 14
Again, go back over your letters in the same exact line you did with the darker color. Play around with holding down the ALT key in certain areas.
Step15
Now go back to the Simple Brush. Dab some more color over you letters still with the brighter red color selected.
Step 16
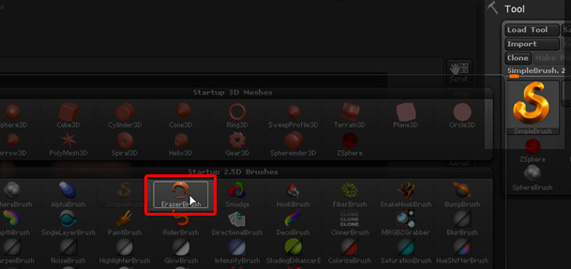
There are some soft edges and we want our text to have a harder look. So select the EraserBrush from the brushes flyout.
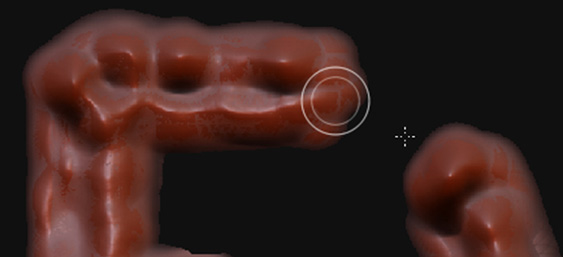
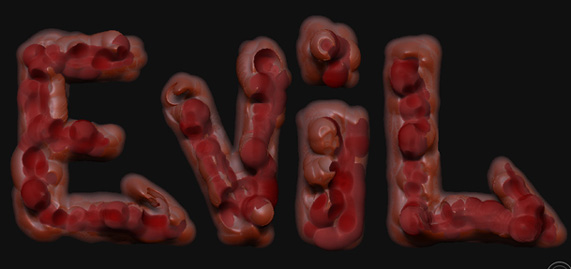
Step 17
Just start erasing parts of your letters, mainly the ends. This is what your text should look like:
Step 18
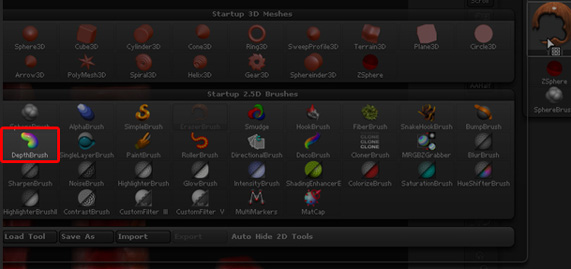
Now go select the Depth Brush
Step 19
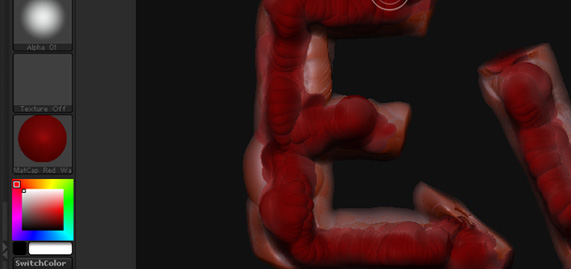
Go over mainly the middle of your text. Make sure you are building up depth by going over areas more than once. When your happy with it, click on the materials and choose the MatCap Red Wax and change the color to White.
Step 20
Go over your text again with this new material and build up the depth.
Step 21
Change the Z Intensity to 54 and change the Focal Shift to -23. Keep painting over your letters. In certain areas of your text, hold down the ALT key and paint back the depth.

Step 22
Now go back to your Brushes and choose the Bump brush. You will want to create little blobs around your text.
Step 23
Now choose a darker red in the color pallet and go add some more blobs using the Bump Brush. I can’t stress it enough, play around with the ALT key to deform your text. After you have added some bumps, choose a lighter red color and add a dash of color into areas.

Step 24
Go to your brushes and select the Smudge Brush
Step 25
We are going to want to smudge the pixels. Drag down the letters of the text. Don’t get too crazy. You can also change the Z Intensity to get a softer effect. Try creating some drips on the bottom of the text. This is what it should look like now:
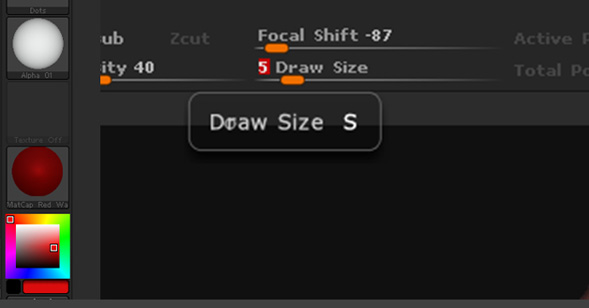
Step 26
Go back to the Bump Brush, change the Focal Shift to -87 and the Draw Size to 5. Then change the color to a brighter red.
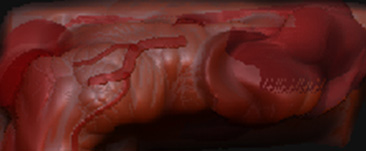
Step 27
Now paint in some single line veins into you text. Try to paint only a few lines per character.

Step 28
Then take the draw size down to 3 and paint in some veins off of your main veins you just painted. Try to change the color to a darker red to get a more realistic look.
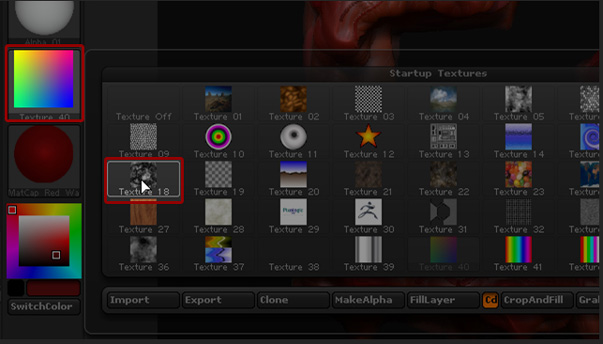
Step 29
Choose the Deco Brush. Click on the Rainbow texture to show the texture flyout. Click on Texture 18.
Step 30
You can now click and drag to create a depth look. Paint them where you feel like the would look good.

Step 31
Now the fun part! We are going to create some evil horn like effect. Choose the Snakehook Brush.

Step 32
Just click, drag, and release. Move your mouse around in swirls and circles. I followed around the text and didnt get to crazy with this effect.
Step 33
Go back to your back to your Bump Brush and single click on areas of the snake hook to give them a bloated look. Play with the colors to get a different effect. At this point make sure you hold down the Alt key and go back over you bumps. This will make it have a broekn apperance.
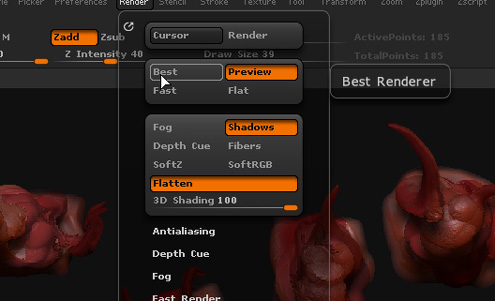
Step 34
Thats it! Now we need to render it out. On the menu go to Render and then choose Best. You might have to wait a few minutes. Look at the orange bar go across your screen.
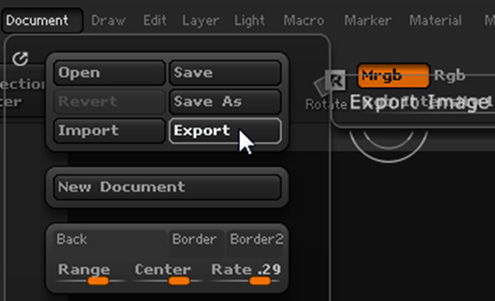
Step 35
After ZBrush is done rendering. We need to export a PSD. On the menu go to Document > Export. Save the file on your desktop so we can open it into Photoshop.
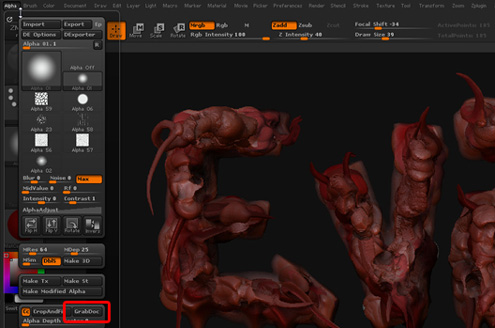
Step 36
Unfortunately ZBrush currently doesnt export an alpha channel with your PSD so we will have to create one. To save an alpha channel, on the menu choose Alpha then press the GrabDoc button. After it creates the alpha channel, choose Export and save it to your desktop. At this point we are done with ZBrush. You can save your document by going to Document > Save As.

Step 37
Open both of your PSD files you exported into Photoshop. Go to your Alpha PSD and create a Levels Adjustment Layer. By going to Layer > New Adjustment Layer > Levels. Drag the white slider to the left to make the gray areas start to go away and the most of the text turns white. For my settings, I had 0 – 1 – 14. Yours will most likley be different.

Step 38
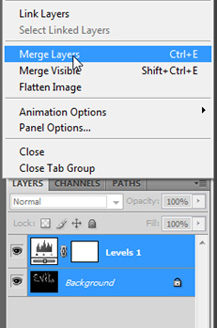
Merge both of your layers by selecting both of the layers and pressing CTRL + E.
Step 39
Now Select All (CTRL+A), Copy (CTRL + C) and then go to your main Evil text PSD. Open your Channels Panel and click on the New Channel Button. Now Paste (CTRL+V) the alpha data into this new alpha channel.
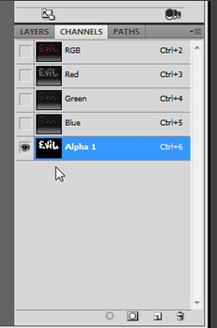
Step 40
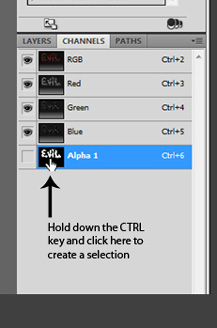
Click on the eyeball for the RGB Channel to show all the channels. Then click on the eyeball for the Alpha 1 channel to hide it. We need to create a selection for the alpha channel. You can do this by CTRL clicking on the alpha channel’s thumbnail.
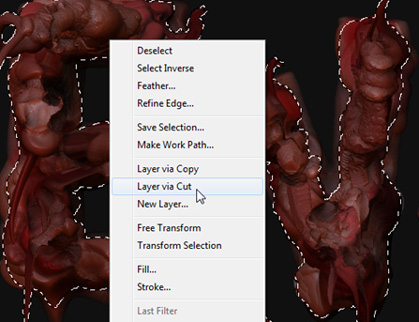
Step 41
Go back to your layers panel, and ALT double click on the background layer to unlock it. Choose the Rectangle Marquee Tool and Right Click anywhere inside the selection area and choose Layer via Cut
This should have created another layer with just your text. If it doesnt look perfect your alpha channel probably wasnt perfect. Try adjusting the levels.
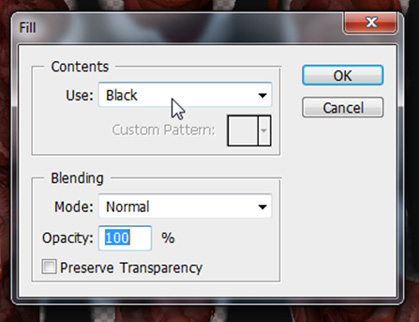
Step 42
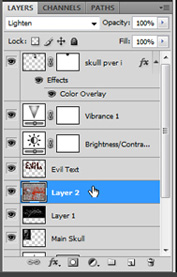
Go to the old background layer and go to Edit > Fill. Change the contents to Use: Black. Click on OK. Name the black layer “Background”. Then name the text layer “Evil Text”
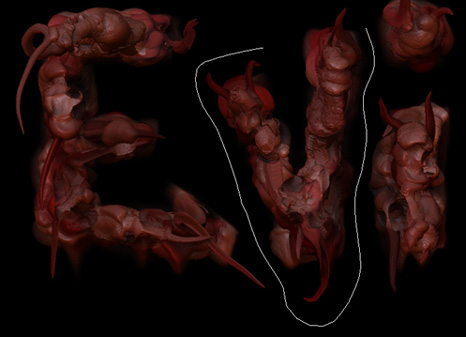
Step 43
Now lets tighten things up, click on the Lasso tool and make a selection around the letter V. Once you have made the selection, hold down the CTRL key and move the letter V closer to the letter E. Do this for the other letters.
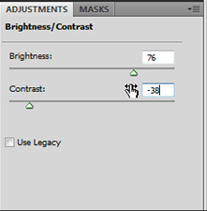
Step 44
Go to Layer > New Adjustment Layer > Brightness/Contrast. Change the Brightness to 76 and the Contrast to -38.
Step 45
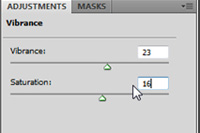
Go to Layer > New Adjustment Layer > Vibrance. Change the Vibrance to 23 and the Saturation to 16.
Step 46
Open the Skull 1 picture from StockVault.net. Copy and Paste it into your main PSD.
Go to Edit > Free Transform. Scale the image down and place it in the dot of the letter I.
Step 47
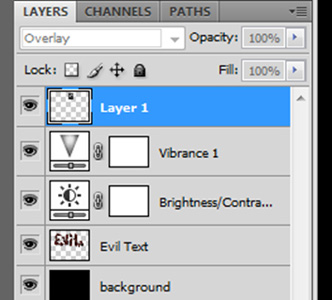
Change the Skull 1 layer blending mode to Overlay. Then lower the Opacity to 84%.
Step 48
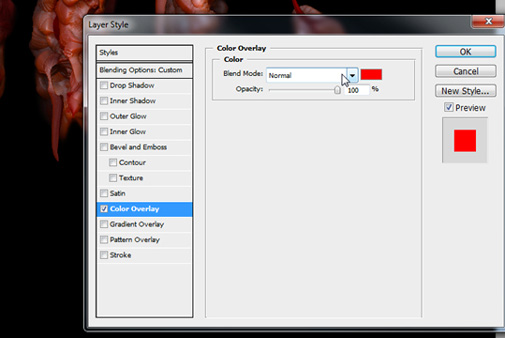
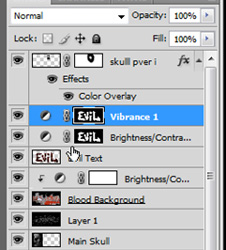
Double Click on this layer to bring up the Layer Styles. Click on Color Overlay and make sure it has a checkmark. Change the Blending Mode to Color. Then choose a Bright Red color. Name this layer “Skull over i”
Tip: If the Skull doesnt look perfect, try scaling it down more, erase or mask out the areas that don’t look good.
Step 49
Open up the Dirty Wall Texture from StockVault.net. Copy and Paste it into your main PSD. Put this texture below the Evil Text layer but above the background. Name it “Grunge Background”.

Step 50
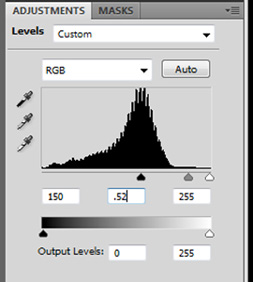
Go to Layer > New Adjustment Layer > Levels. Change the first input box to 150. Seond box = .52 and the third = 255.
Step 51
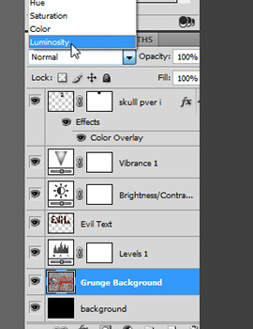
Change the layer “Grunge” blending mode to Luminosity. This will get us a nice grunge look.
Step 52
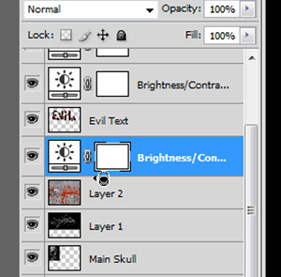
Open Skull 2 from stock vault.net. Copy and Paste it into your main PSD. Use Free Transform to place it in the Upper Left. Make sure the Skull is below your text. Name the layer “Main Skull” and change the Opacity to 38%. Finally, desaturate this Skull by pressing CTRL + SHIFT +U.
Step 53
Open the Media Militia resources you downloaded and open Scribbles.jpg. Copy and Paste it into your Main PSD. Change the Layer Blending mode to Screen. Then press CTRL + I to invert the layer. Now Change the layers Opacity to 14%. Place the scribbles layer below your evil text layer.
Step 54
Open the Dirty Wall texture from Stockvault.net again. Copy and Paste it into your main PSD. Change the layers blending mode to Lighten.Place it right below your evil text in the layer stack.
Step 55
Go to Layer > New Adjustment Layer > Brightness/Contrast. Change the Brightness to -150 and the Contrast to 100. With the Brightness/Contrast layer selected. Go to Layer > Create Clipping Mask.
Tip: You can also hold down the ALT key and click inbetween the layers to create a clipping mask.
Step 56
Choose a soft brush and paint in black into the dirty wall bloody background. Using the Marquee select tool, select an area of the image as pictured below and Choose Image > Crop.
Step 57
Control click on the Layer Thumbnail of the Evil Text to make a selection of just the text. Press CTRL + Shift + I to invert the selection. Now fill the layer masks for both the Vibrance Layer and the Brightness/Contarst layers with Black. This should make your text appear to brighten up dramtically compared to a darker background.
Step 58
Click on the Blood Background layer and using a black brush, brush out unwanted areas. I didnt care for the purplish blue next to the E. I also brushed out some areas in the Grunge Background and Main Skull layer.I then dropped the Opacity down on the Blood background to 78%. This is what I ended up with.
Step 59
In the Media Militia resources, open up the Grunge.PNG and Copy and Paste it into your main PSD. Position it with the Free Transform (CTRL + T) to fill the whole area. Make sure that it is below the evil text layer.

Step 60
Finally open up the 3 evil text jpgs from the misc Media Militia resources into your main PSD . Set each Layer blending mode to Screen and the Opacity to 15%. Place them where ever you feel.
That’s it. Hope you enjoyed this tutorial. If you had any problems, please leave a comment and I will help you out.
Great results! I will be taking this shortly. I have not used ZBrush before but I will now.
Ewwww! Sick looking.
Good job on the tut!
Man this is an INSANE tutorial! Probably one of the most creative typography tutorials I have seen yet, thanks!
@Promotional Printing: Wow… Thanks! That means a lot to me.
Incredible tutorial. Just a little bit long, but the finish definitivly worth it!!!
http://www.aditivovisual.com
@santiag0neira: Yeah it is long. Took forever to make. I need to try to find a balance on the length.
very very cool man. just in time for halloween =P. The closest i have ever gotten to sculpting programs before this was some basic stuff in anim8or. and again, i can’t say it enough, very very cool
ughh lol! thats nasty xD
This is the most disgusting thing I’ve seen in years!!!
But, Man it is BEAUTIFUL too.
Great Work.
Thanks Alot for sharing your time and knowledge, the Tutorial was excellent very straight forward and easy for a beginner like me to follow. I learned more then I set out to thats the biggest compliment I can give LOL! You Rock Jeya!
awsome loveing this tutorial, have been playing with z-brush a bit but havent realy played with 2.5 sculpting, will be giving this a go when i got home though. thanks keep up the good work!
this is awsome man wooow i really love it …. this is what i call it a “Tutorial”
details that’s wat i luv dude 😀
tnx a lot 😉
no dout
about it
Very cool, but Zbrush no longer appears to offer a free trial and is a quite expensive piece of software. 🙁
Excellent tutorial about evil 3d text . Thanks guy .