
In this tutorial you will learn how to create some Flat 3D using only Photoshops Brushtool. In the past I used to use just an action to duplicate and move but this way is much more easier and give you more flexibility.
Step 1
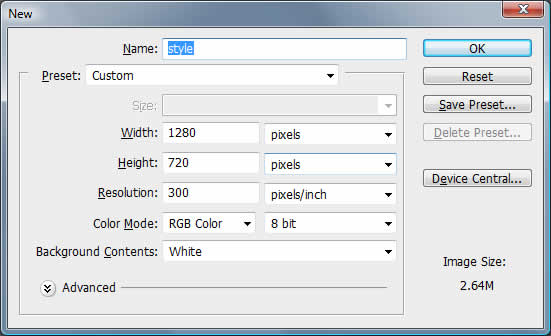
Open up Photoshop and create a New Document. I created a document that is 1280 x 720 at 300 ppi and named it style.
Step 2
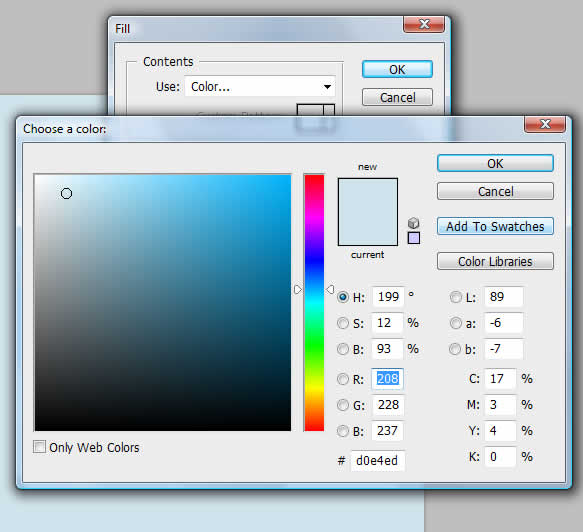
Let’s change the background color to a nice mild blue. On the menu bar choose Edit > Fill. In the dialog box change the Use dropdown to Color… Choose #d0e4ed
Step 3
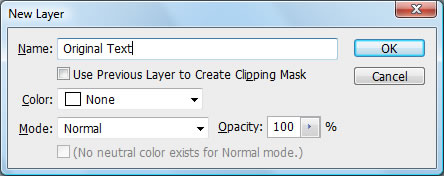
Create a New Layer (Layer > New > Layer) and name it Original Text
Step 4
Choose the Horizontal Type Tool (T) and type in the text ‘style’. I used Helvetica Neue LT at 27pt. If you don’t have that font, use something like Arial. Make sure the color of the text is black (#000000)

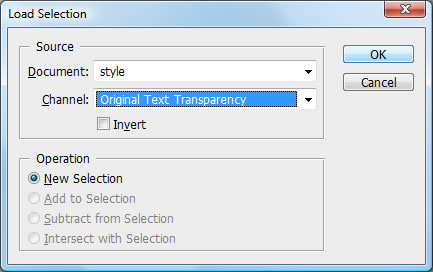
Step 5
We are now going to create a brush out of this text. Choose Select > Load Selection. Make sure the Channel is set to Original Text Transparency and click OK. This will make a marquee around your text. Note: Your document name might be different.
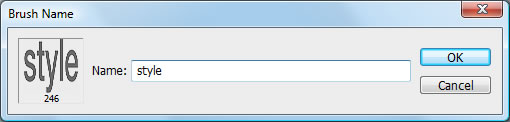
Step 6
Now go to Edit > Define Brush Preset and click on OK
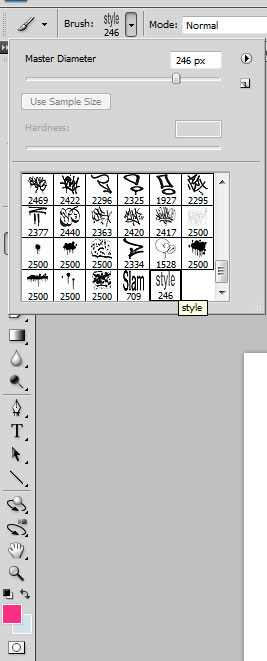
Step 7
Create a New Layer and name it Stroke. Deselect everything by going to Select > Deselect. Choose the Brush Tool (B) and in the Brush Options toolbar click on the drop down triangle and find the brush you just created and select it.
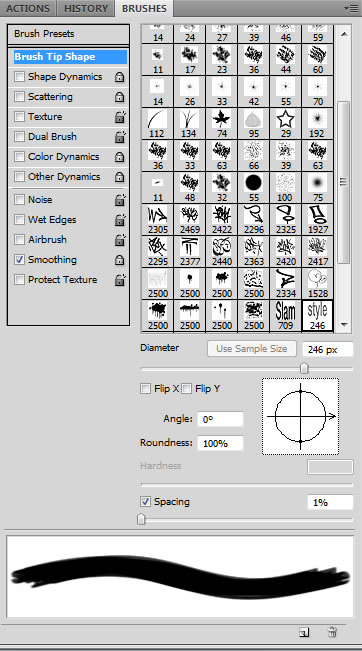
Step 8
Open the Brushes Panel (F5 or Window > Brushes). Click on Brush Tip Shape options. Change the Spacing to 1%.
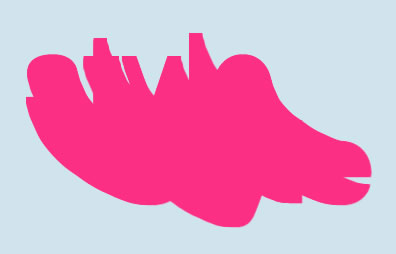
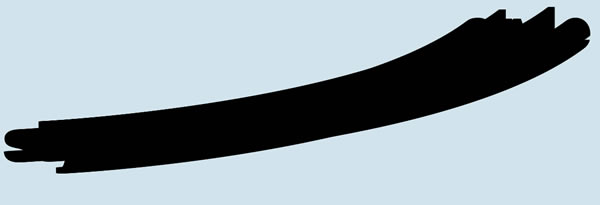
Step 9
Now for the fun part! Change the Foreground Color to a nice eye popping pink – #fd2f84 by double clicking on the foreground color in the toolbar. Make sure you are still on the Stroke layer and with the brush held down make a nice swoop like stroke.
![]()
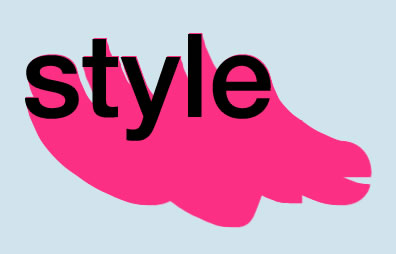
Step 10
Inside of the Layers (F7) Panel, drag the Original Text layer above the Stroke layer Then using the Move tool (V), move it over the swoop you just made.
 .
.
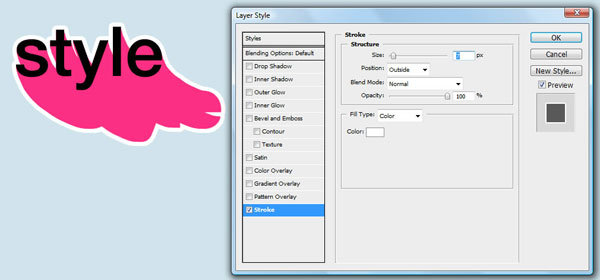
Step 11
Double click on the Stroke layer in the layers panel. Click on the Stroke checkbox and set it to have a 7 px Size Stroke of White.
Step 12
Using the Brush tool is fun and all, but sometimes you might want a cleaner look. We can accomplish this by using the Pen tool.
Click on the Pen (P) tool and draw a line or curve. Something like this:

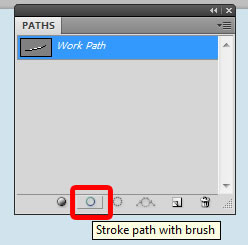
Step 13
Change the Foreground Color to Black (#000000). Create a New Layer and name it Stroke 2. Open the Paths panel (Window > Paths) and click on the Work Path you just created with the pen tool. Now click back on the brush tool. Click on the Stroke path with brush button at the bottom of the Paths Panel. You should now have a black 3D style. See how that looks a lot cleaner? Note: You can delete the Work Path to get rid of the Pen line.
Step 14
Now Duplicate the Original Text layer by selecting the layer and going to Layer > Duplicate Layer. Click on the Horizontal Type Tool and change the color of the text to the pink color (#fd2f84) in the Type Options Toolbar. Move it into position above the Stroke 2 layer.


Step 15
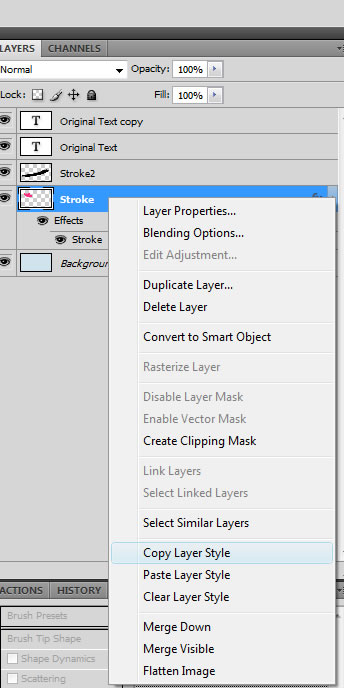
Now Right Click on the Stroke layer and choose Copy Layer Style. Then Right Click on the Stroke 2 layer and choose Paste Layer Style. This will create the stroke so that it is exactly how the other one was.
Step 16
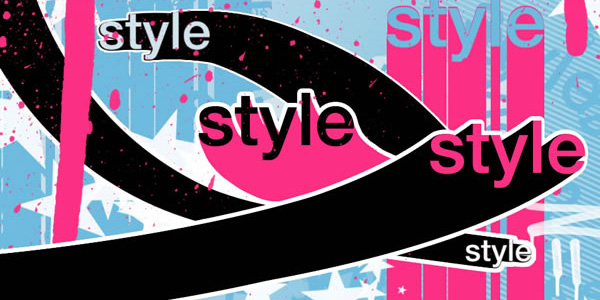
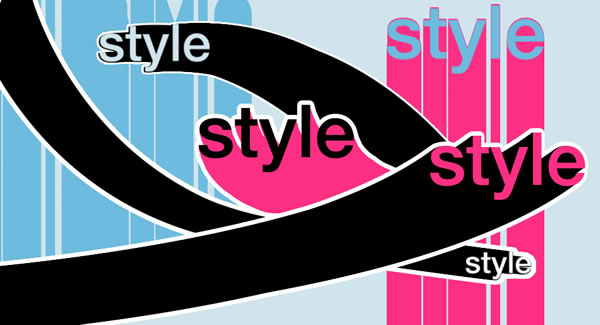
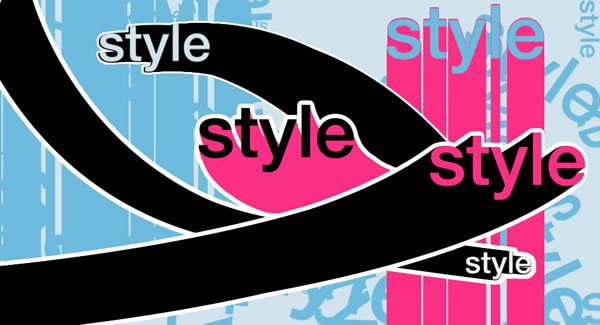
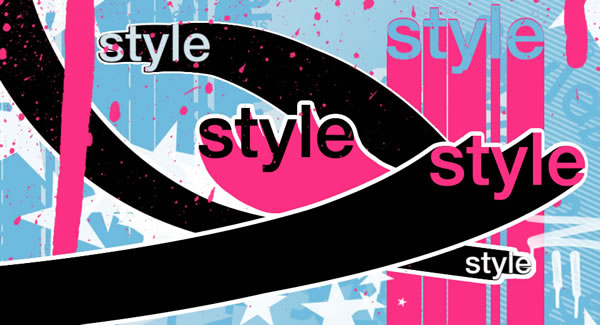
Let’s create some more! Using the same techniques as above, create some more stokes and text layers. Try experimenting with the size of the brush as well as moving around the elements and layer stacking. I decided to crop mine a little bit. Here is what I came up with:
Step 17
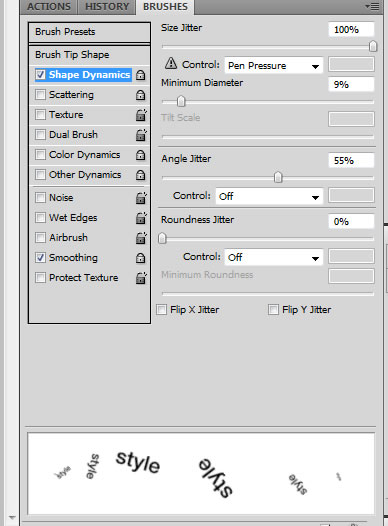
We are going to add a lot of style text behind everything. Create a New Layer and name it Lots of Styles. Make sure this layer is just above the background layer in the layer stack. Open up the Brushes Panel and in the Brush Tip Shape options, change the Spacing to 416%. Check the Shape Dynamics option, and change the Size Jitter to 100%, Minimum Diameter to 9%, and the Angle Jitter to 55%
Step 18
Now choose a slighly darker blue Foreground Color I used #6dbbde. With the Brush tool selected, hold down the mouse, move around and it will randomly place the text everywhere on your document.
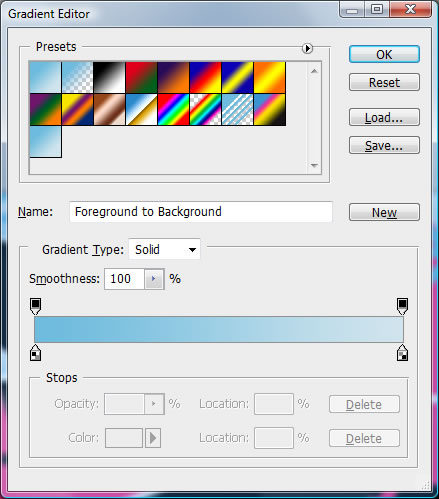
Step 19
Choose the Gradient Tool (G) and select Linear Gradient. Open the Gradient Editor by clicking on the gradient. I choose the colors #6dbbde and #d0e4ed. Click OK. With the gradient tool setill selected, select the Background layer and drag from left to right across your project to create the very nice subtle gradient.

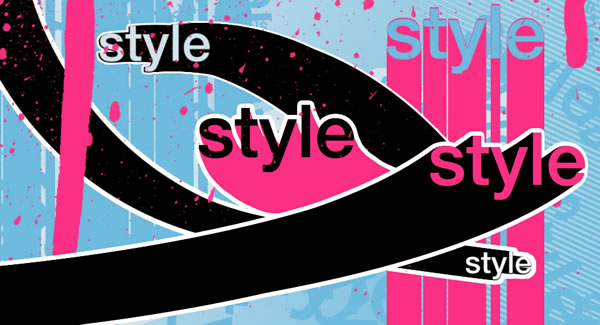
Step 20
Open up the lines.eps from the Support files and copy and paste the lines into the right hand side of the document. You might need to Transform and Rotate it so it fills the whole area. Make sure the layer is just above the Background gradient layer. Change the Opacity of this layer to 71%. Now change the Layer Blending mode to Overlay.
Step 21
Open spraypaint.png and place this layer into your project. Double click on the spraypaint layer to bring up the Layer Styles. Choose the Color Overlay option and change the color to the same pink color (#fd2f84). Position the layer so it looks good. You might need to transform it a little.
Step 22
Open star.eps and create a brush using the same settings like we did in Step 17. Change the Foreground color to white and brush some stars into your document. That’s it we are all done!
Great outcome
amazing tutorial..look simple and great
thanks and added to my blog
cool tutorial…
this is very useful of my learning ps…
add more tutorials to my mail…
thank u
it’s COOL work , Thanks a Lot 🙂
thanks man, i tried out this technique for one of my clothing designs and in my opinion it turned out grand. check it out at my site if you want.
Hi, good post. I have been woondering about this issue,so thanks for posting. I’ll definitely be coming back to your site.
I really like your post. Does it copyright protected?
To fill a blank?
I love it, thank you so much for sharing your knowledge!
This rather good idea is necessary just by the way
Thanks for this. Really great ideas, very inspirational… I LOVE THIS SITE!!!
I love this tutorial, it was easy to follow and besides the eps files I could do it all, for those I used my own ideas and It came out really cool. This serves it’s purpose of sparking inspiration. Thank you very much for all this you and your team have out there for people like me trying to better my skills. *blows kisses*
Cool
thanks for the catch. I’ll get in there and fix it….
Terribly Interesting send! Thank you in search such provocative resource!PS: Wretched representing my bad english, I’v well-deserved started to learn this parlance
thank you!
Nice One…!!! ^^
I got confused on step 13. It didn’t work for me!!
Step 13 didn’t work for me either, when I clicked on the brush tool and went over to “stroke path with brush” button it wouldn’t let me click on it? Any suggestions?
Hey I learned something new! Thanks so much!!!
Huh… amazing and a lot of tricks….. always helpfull…
Tanks a lot ! This is exactly what i need for one of my website.
Once again, thank you !
Hey Nice Tutorial ive done this own myself 🙂
http://imrocker.deviantart.com/art/Mind-Fuid-181075906
Thanks for this awesome tutorial 😀
i love this, it made me happy to my soul, omg yal r amazing!!!
How would one create this same effect in illustrator?
Maybe we will do a tutorial…..